
App Builder Release: Master-Detail Style Apps Using Variables & Events
Want to build Master-Detail Style applications? You can now do it with low-code App Builder. Read more.
App Builder excels at creating user interfaces with modern frameworks. It allows you to bind real data and perform CRUD operations, but now it goes beyond that. With the most recent release, we introduce new concepts like Variables, State management, and Selection events to bring your apps to life, enabling missing patterns such as Master-Detail.
Master-Detail in App Builder: Overview
Initially, this feature was planned to follow the basics of the Master-detail design interface. But it evolved into something much more. In essence, it is a way to present a list of records and enable the user to manage them easily. It usually comprises two views:
- One is the master list of records
- The other is used to display extended data about a single record
You use this UI pattern in your daily work and activities. Common examples of Master-detail UIs are Facebook Messenger, all mail clients like Outlook and Gmail, and 80% of Flight booking websites.
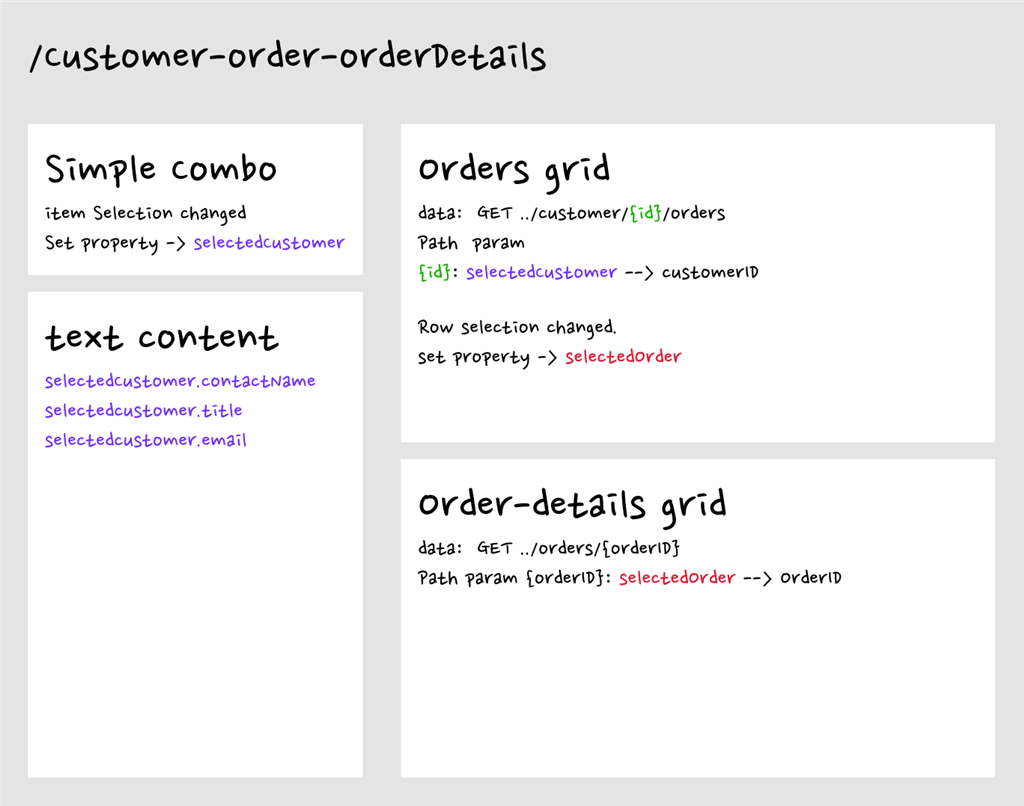
Thanks to the rich UI components set in the App Builder, we now provide you with the tools to create more complex designs that go beyond the common master-detail use cases.
This is possible through a new concept that we introduce – application Variables. These Variables and the new Event Actions are the glue and core of your data storage and state management. This means that you can bind a component’s event to these variables and use the context to make your app more dynamic and alive.
The new feature covers these key elements established by the Master-Detail pattern:
- Primary pane: As explained earlier, an area that contains a list of items or anything that can initiate loading of other parts of the app.
- Details pane: This area shows the details of the particular item that you select in the Primary pane area. It can consist of a variety of components that interact with each other, aiming to show as much information as possible based on the data you’ve provided.
- Interactions: This is about the interactions between the items in the master and their details. For example, if you select an item in the master, the details could be displayed in the pane next to the Master pane, or in a pop-up, or you could drill down more pages. You could broadly classify the interactions into context, drill-downs, and pop-ups.
Let’s dive into more details about the new features.
Note: For the walkthrough below, we will be using the Northwind WebAPI.
1. Managing Variables
Simply put, you can now pass data between components in your application through:
- Global variables – used to pass data between views
- Local variables – used to pass data between components of the same View
Variables can be of type String, Number, Boolean, Date, Object, and Array.
For any of the primitive types, you can specify a Default value with a value editor. As for Array and Object, you can pick an endpoint or Schema type from the fly-out menu. We list those based on the available data source schemas in your app.
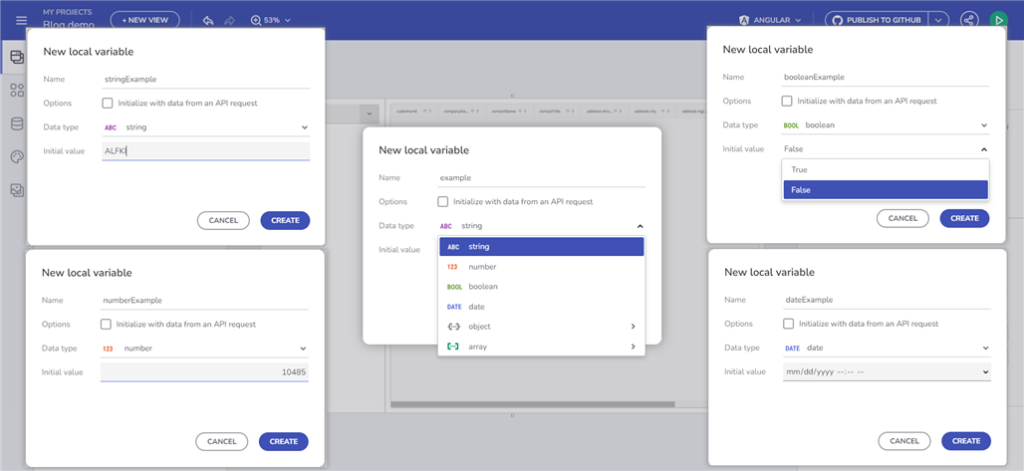
There are two ways to start working with variables:
1.1. Through the event handler for the specific component that will be using the Variable
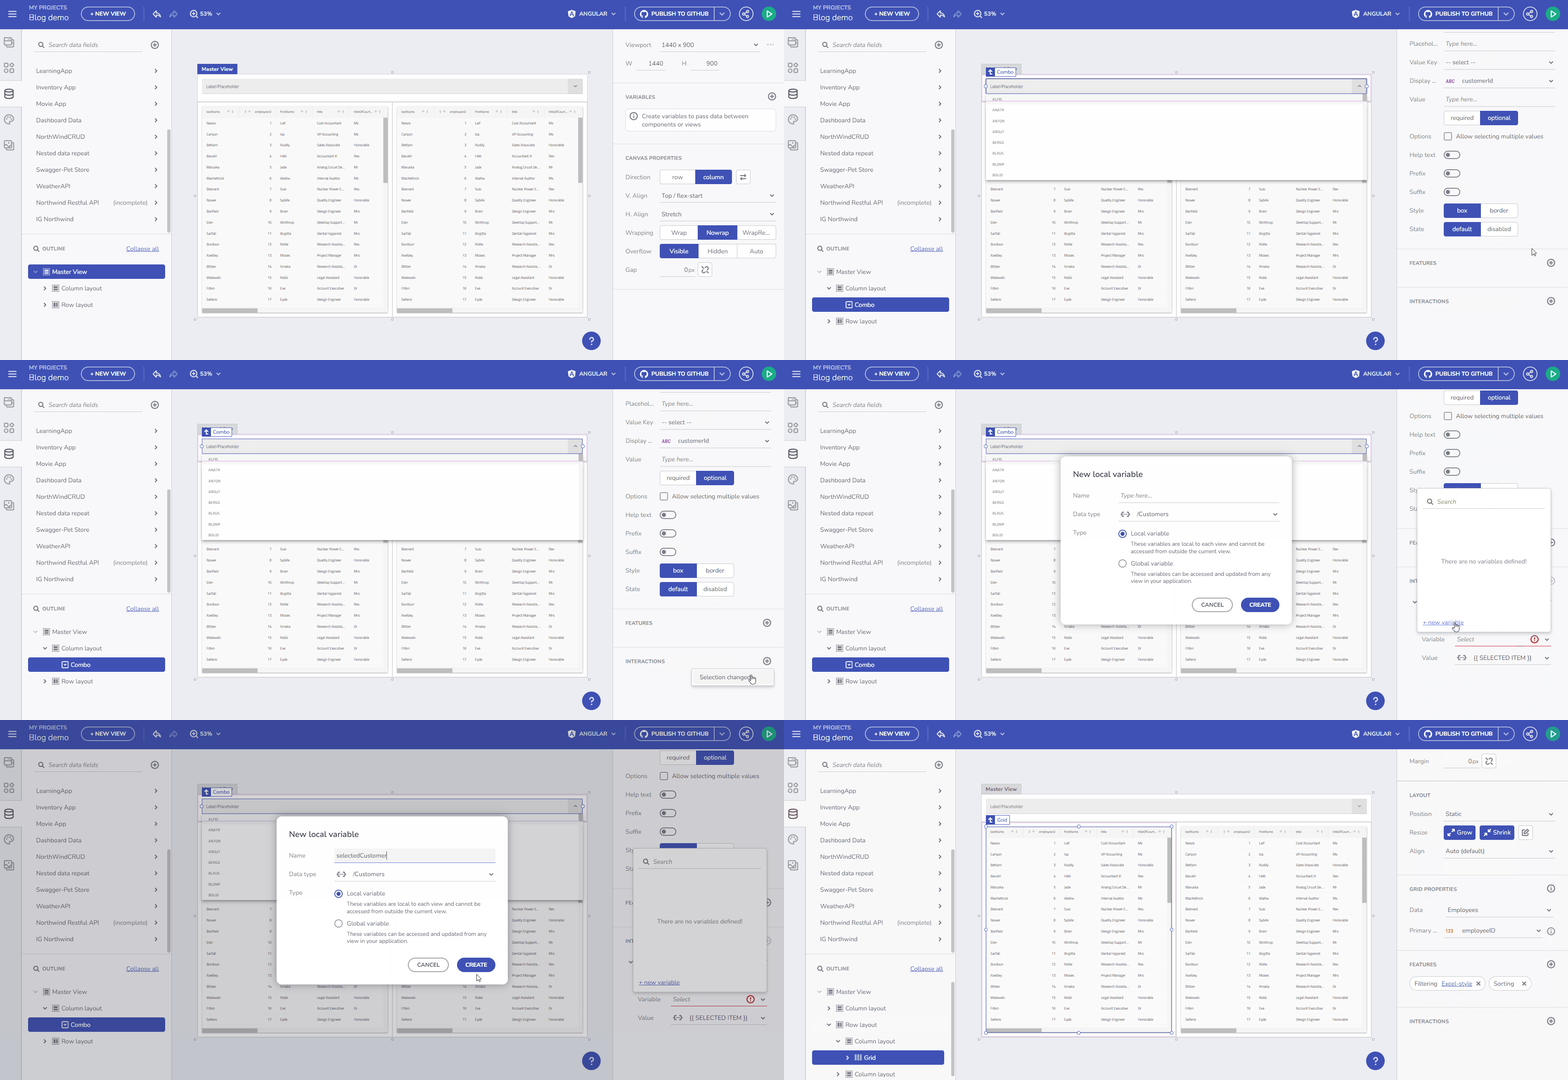
For example, if you add a Combo bound to the Movies table and add a Selection Changed event handler with Set Variable Action, you can pick the Variable field and use the “+ new variable” button.
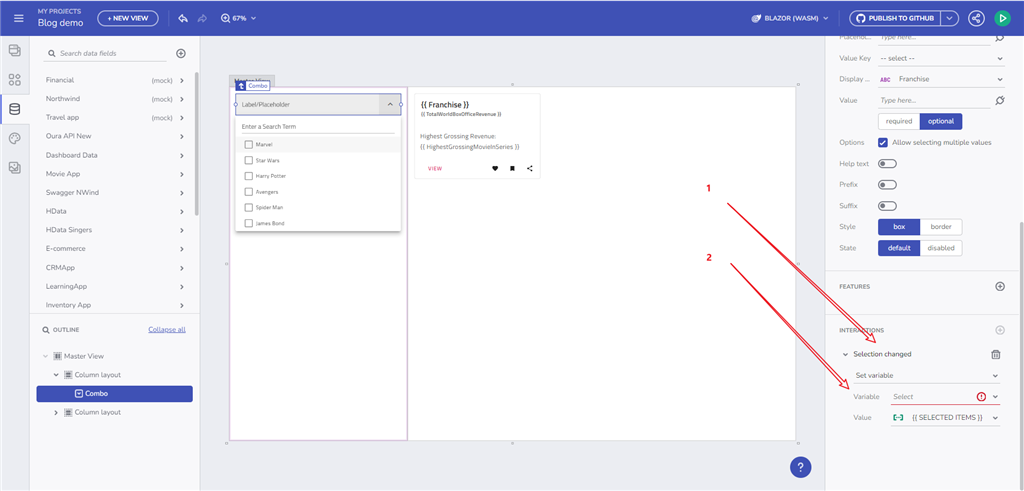
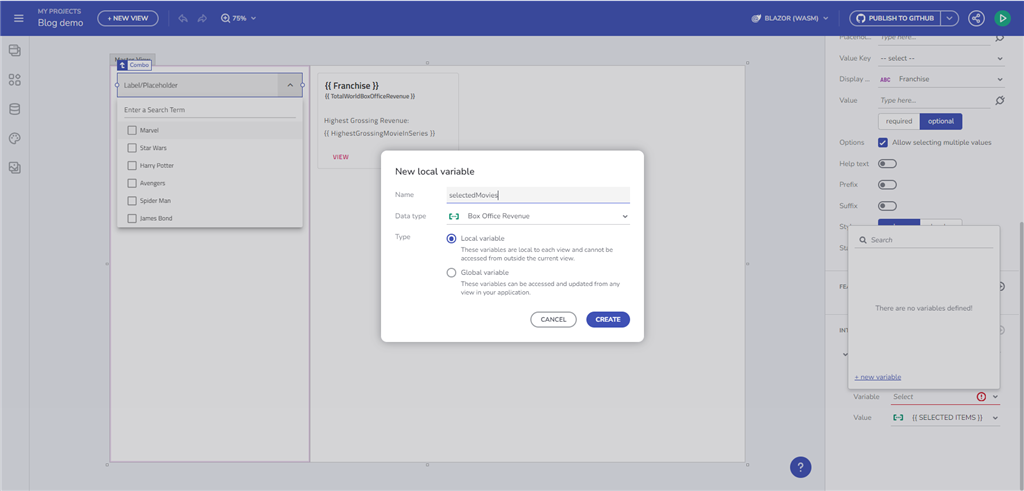
Clicking this will open the New Variable dialog with the Data type already pre-filled for you, based on the Combo Data source type (Box office revenue) and the Combo selection mode. Why? If Single-selection mode is specified, the variable is expected to use a single object (Box office revenue) and if multi-selection mode is used, it should use an array of objects (Array of Box office revenues), as it is in our case.
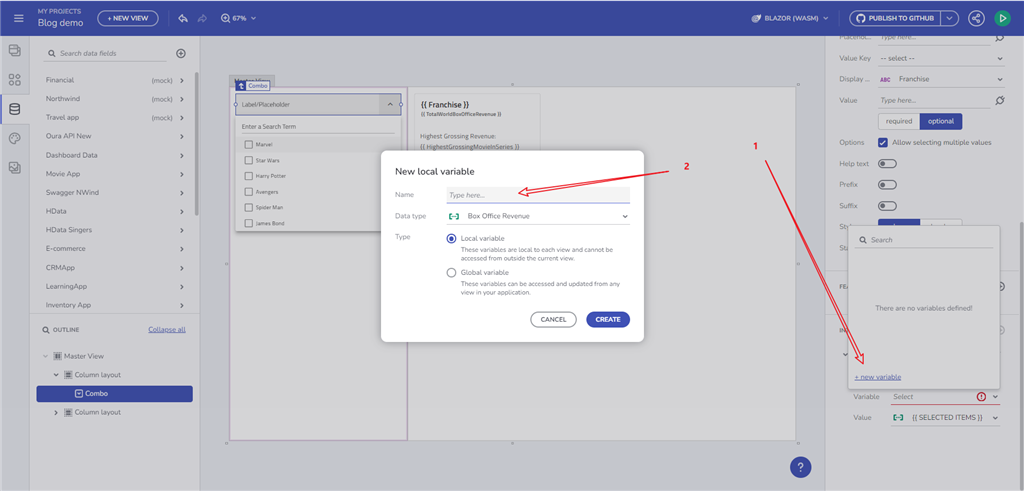
We consider this as the main flow of Variable creation as it is part of the application lifecycle creation:
.. you start with a component
.. bind it to date
.. add an event
.. tight it to a certain action (Set Variable action)
.. create a variable to preserve the state
.. and use this variable later on within your app
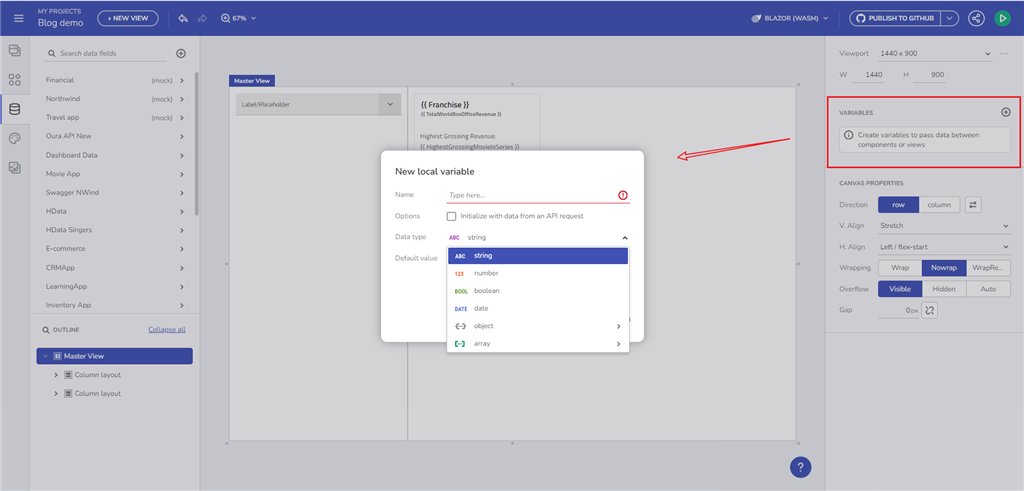
1.2. Create a variable through the Variables section.
From there, you can open a dialog to create and edit variables. There is a validation in place that will guide you through the naming process. There are two ways to set a variable type, whether by specifying it as a type from the predefined in the drop-down menu or through the automatic initialization from an API request (by selecting an endpoint). With that option, the Data Type will be automatically picked based on the Schema data type of the selected endpoint.
In the section below, you will find more details on how to make use of the Variables.
1.3. Initialize data from an endpoint
You can now store data in a Variable and use it in the data context for any of the existing components. It also automatically detects what the Variable type is based on the endpoint that you picked. We get that information from the Data Schema.
Let’s look at the example below. I am initializing data from a /Customers endpoint request and later on bind this data to a Combo component. The infer type is Array of Customers.
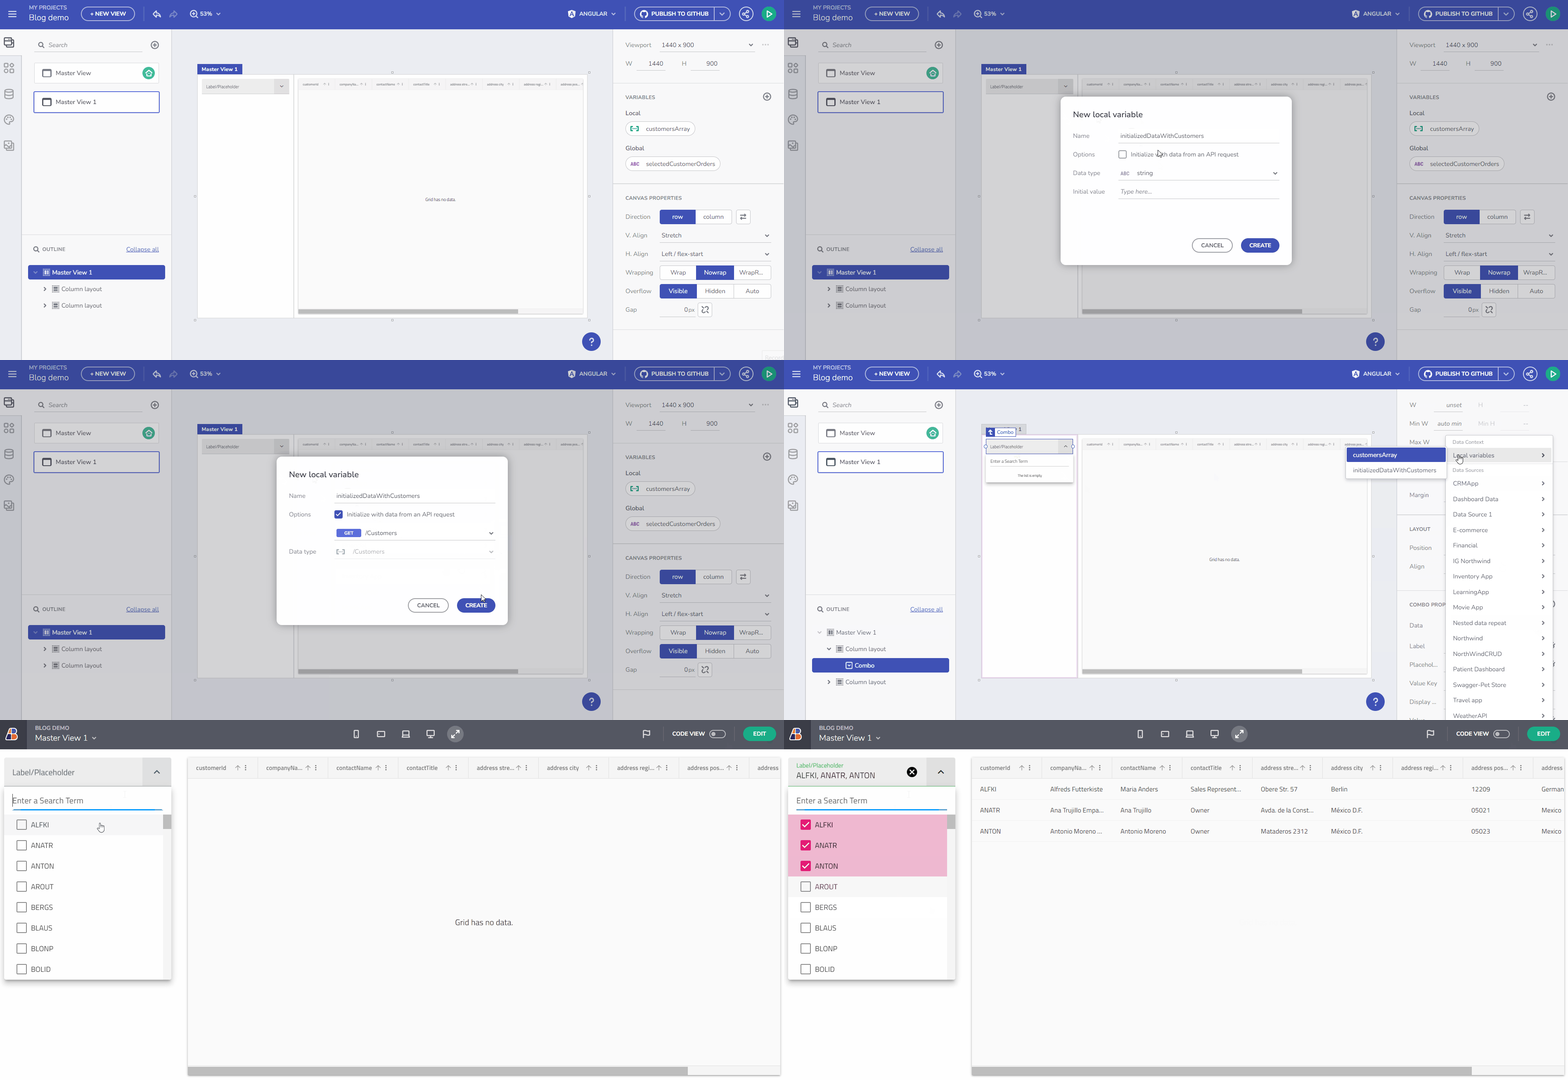
1.4. Set a variable value through Component event context or Data context.
This functionality allows you to dynamically fill an empty variable with data. An example would be an empty variable of type Customers Array – `selectedCustomers.` The gif below shows you how to create such a variable and start filling it with data upon Combo value selection changing. The final step of this scenario would be to bind a Grid component, for example, to the `selectedCustomers` array.
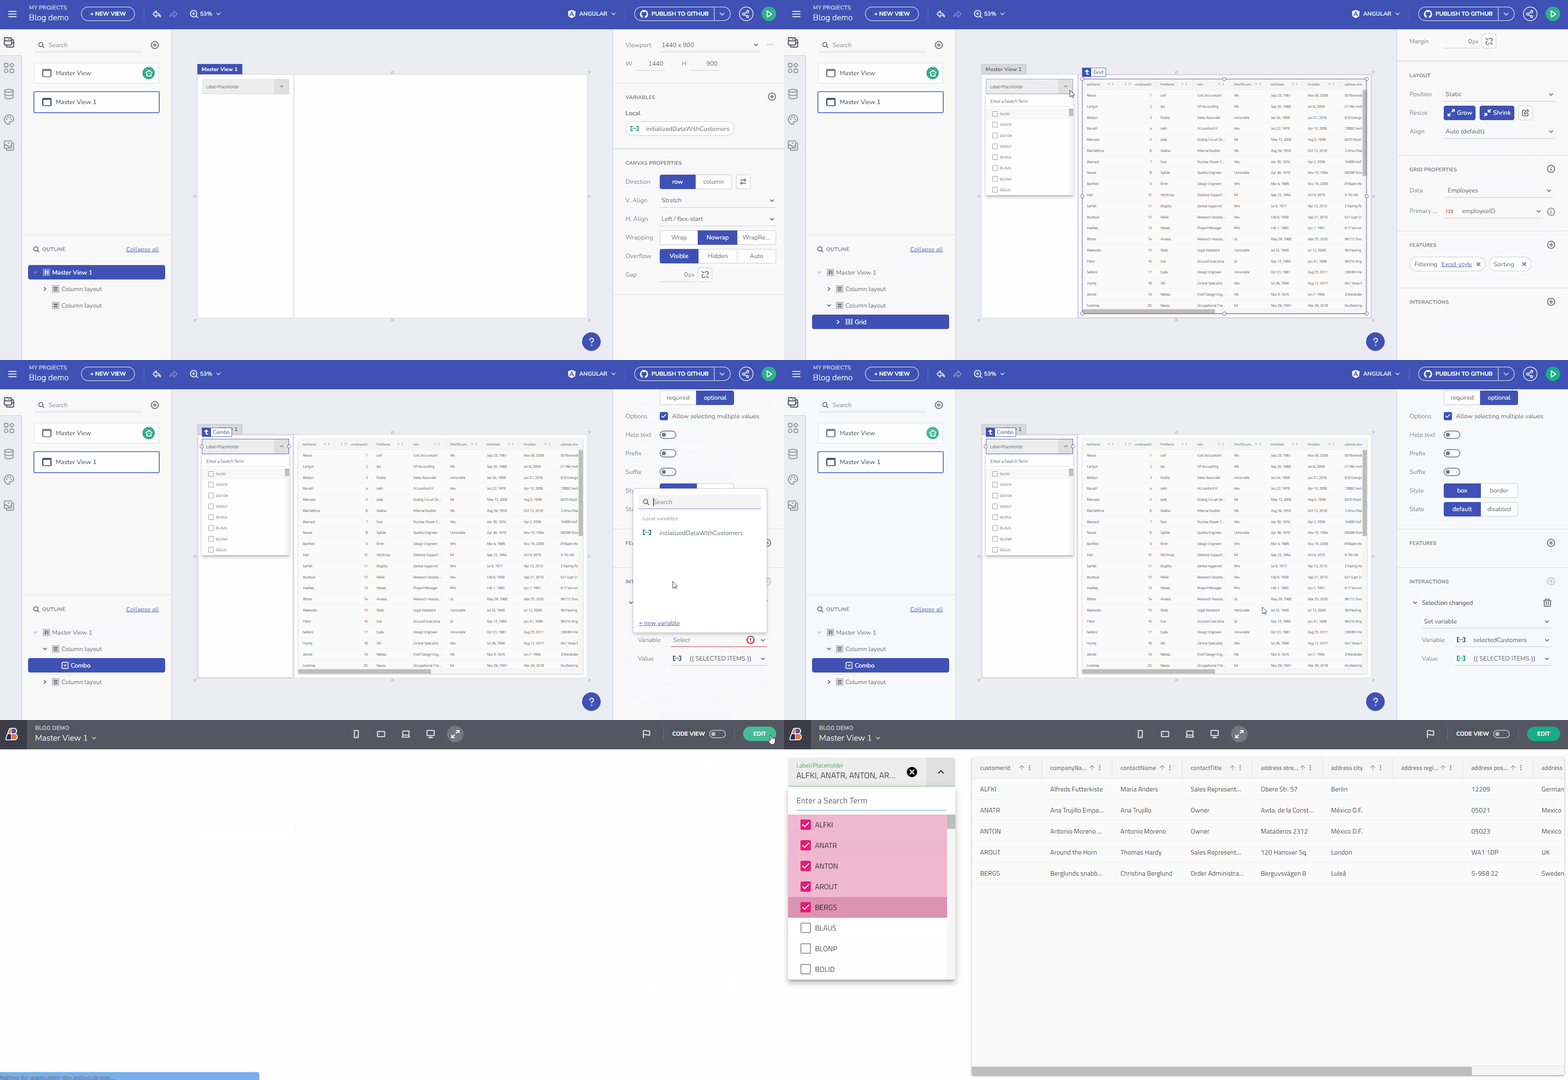
A similar scenario is listed as part of the next Binding to Components section, although the main focus here would be properties binding rather than setting a Variable value.
2. Expanded binding options
When I talk about binding to components, I mean binding to the actual properties of the component configuration. The actual binding happens through a plug icon shown in each bindable component property. Let’s look at the following example. Previously, to set a Title and Subtitle of a Card component, you had to iterate through an array of data, and only then a data context will appear as a binding option, which will allow you to set a specific data field. Now, the variables provide a context that enables any component to bind to it, not only to a data-repeated context. Hence, you can create any type of variable and bind it to a simple Card without a data repeater.
2.1. Data repeating through a variable of type array
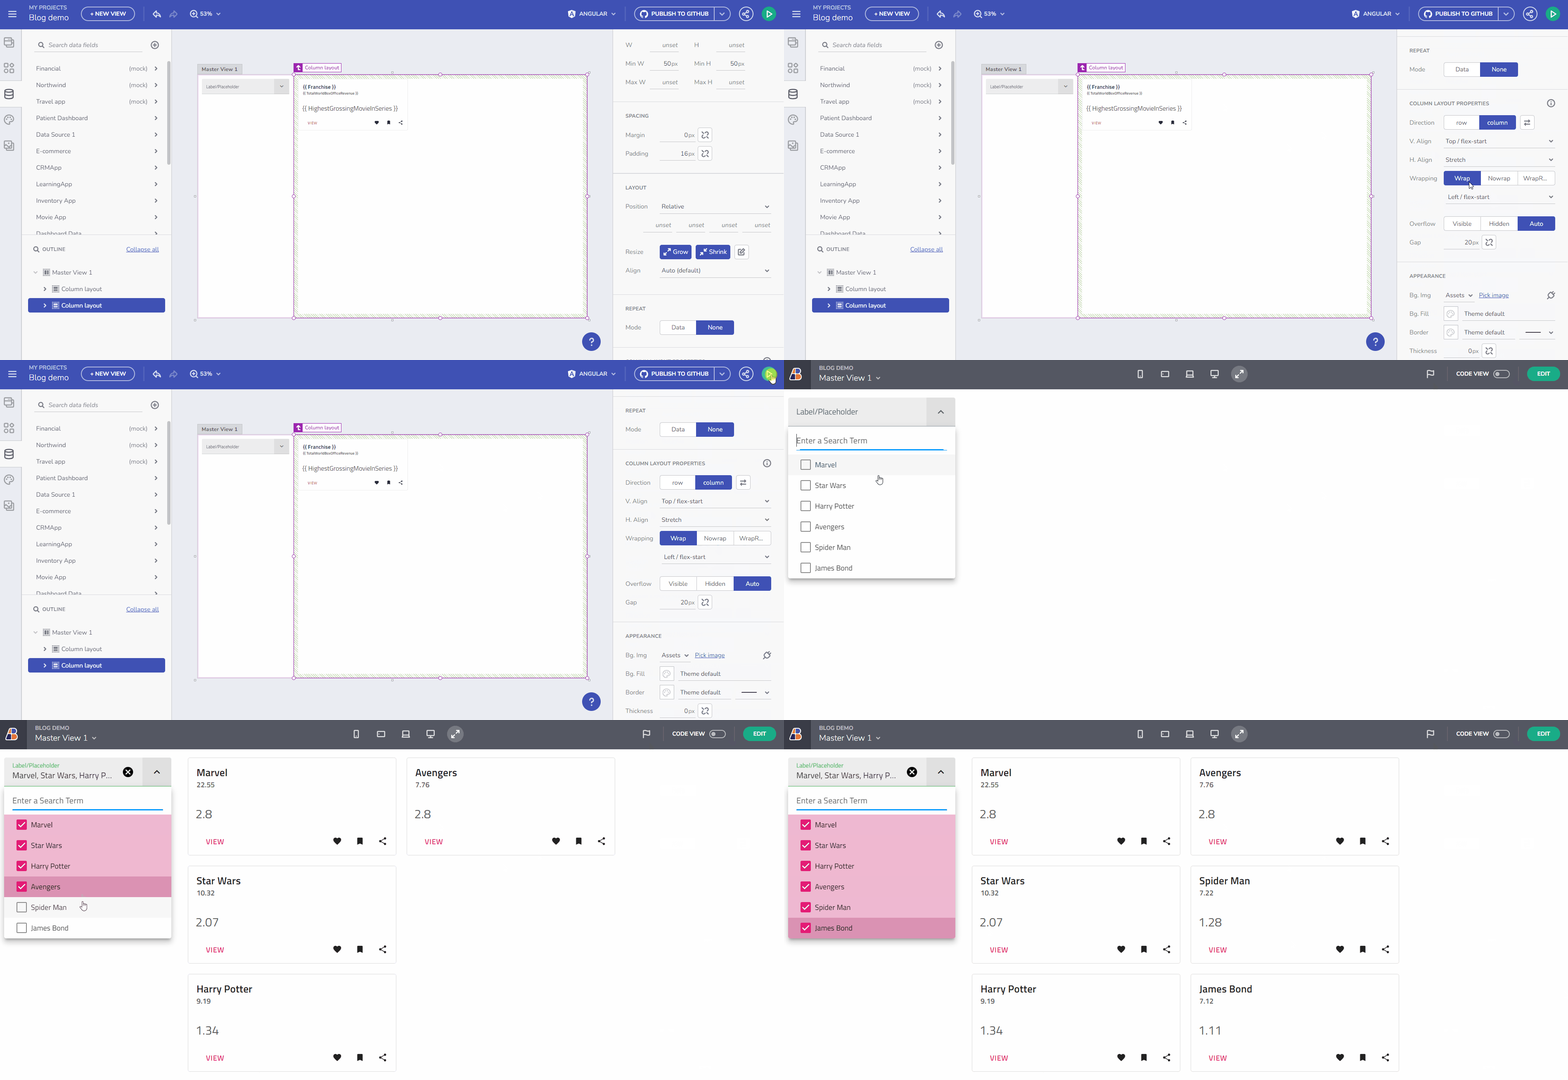
Imagine that I have a collection of Movies, and I want to show a list of details about the highest-grossing Box Office Movies based on multiple selection that I perform. How can I do that?
- Bind the Movies collection to a component with multiple selection capabilities (Combo) and follow the flow that we covered above of adding an event handler and Set Variable action.
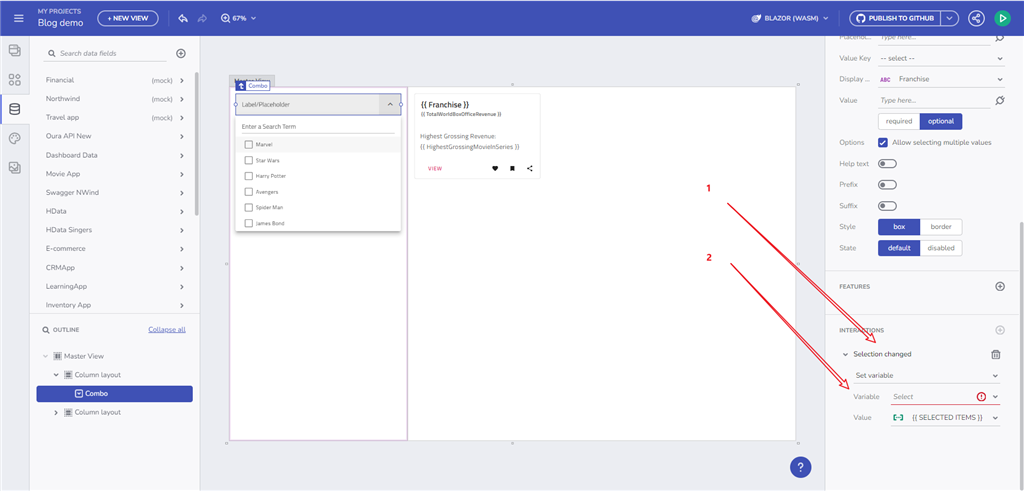
- Create an empty Array variable of type Box Office Revenue. The Data Type will be pre-filled for me based on the Data Source provided for the Combo component.
- Add a card component and bind it to the newly created variable “selectedMovies.” Bind Title and Subtitle properties to data fields from the Data Context:
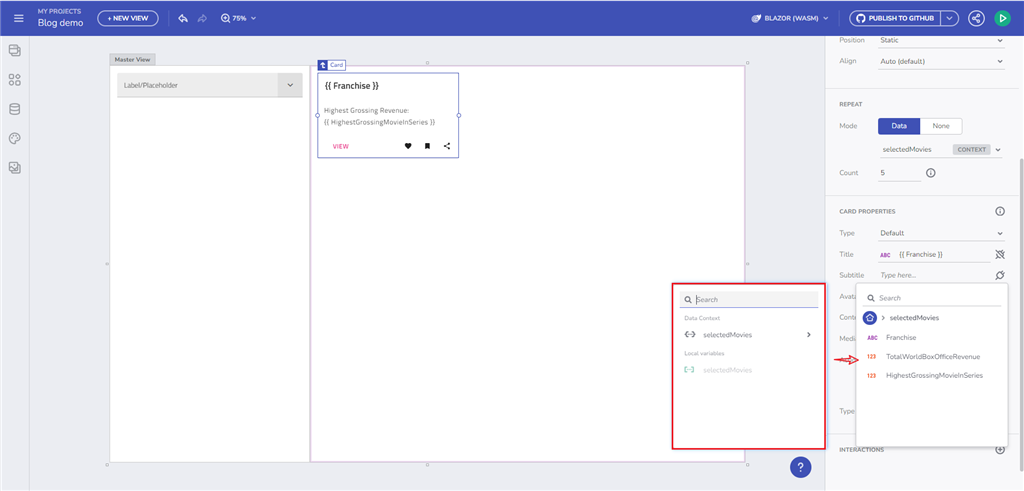
Here is the result of our changes:
2.2. Cross-view communication with Global variables.
So here is what we know:
- Global variables are used to pass data between views.
- Local variables are used to pass data between components of the same View.
This means that you can use Global variables across different Master and Child views. If you create a global variable in one view, it will be visible in all other views as well.
3. URL parameters binding for data requests and repeaters
3.1. Data Requests
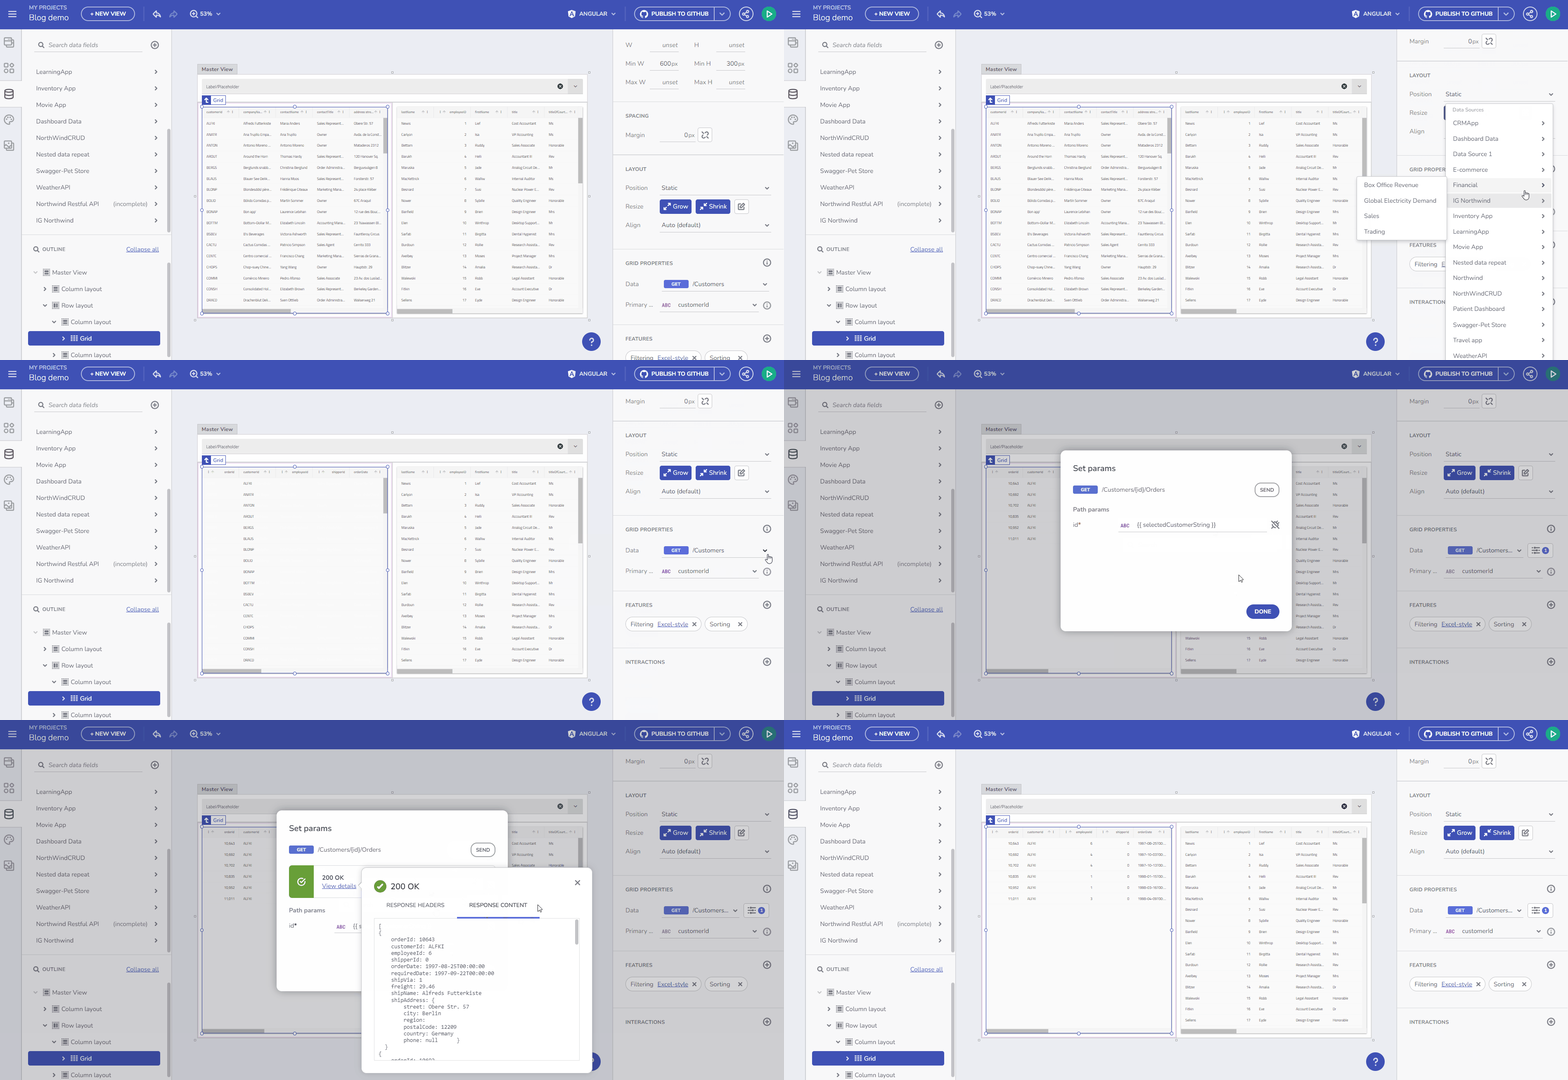
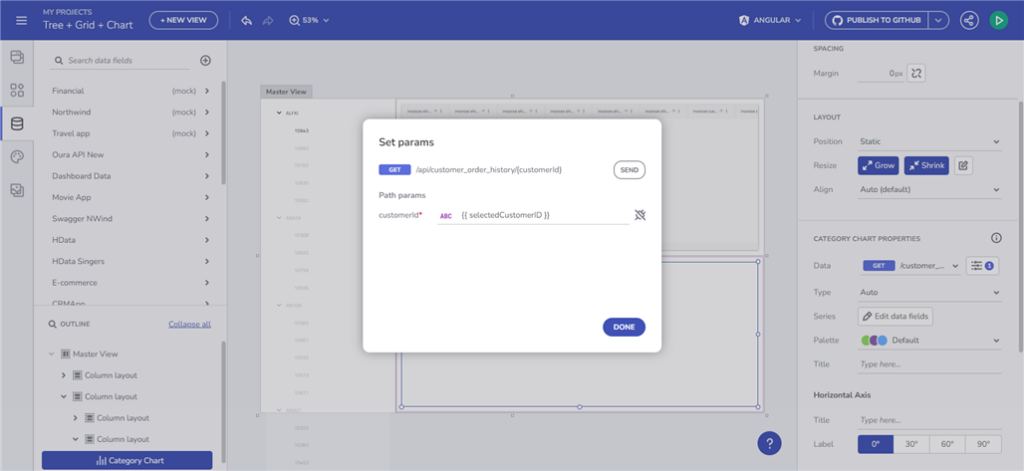
If you specify the data endpoint that expects path/query parameters, now you can specify them, and once present, a data request will be made fetching the data based on the provided parameter. Example with Grid bound to Customers Orders, based on “CustomerID” path parameter
3.2. Data Repeaters
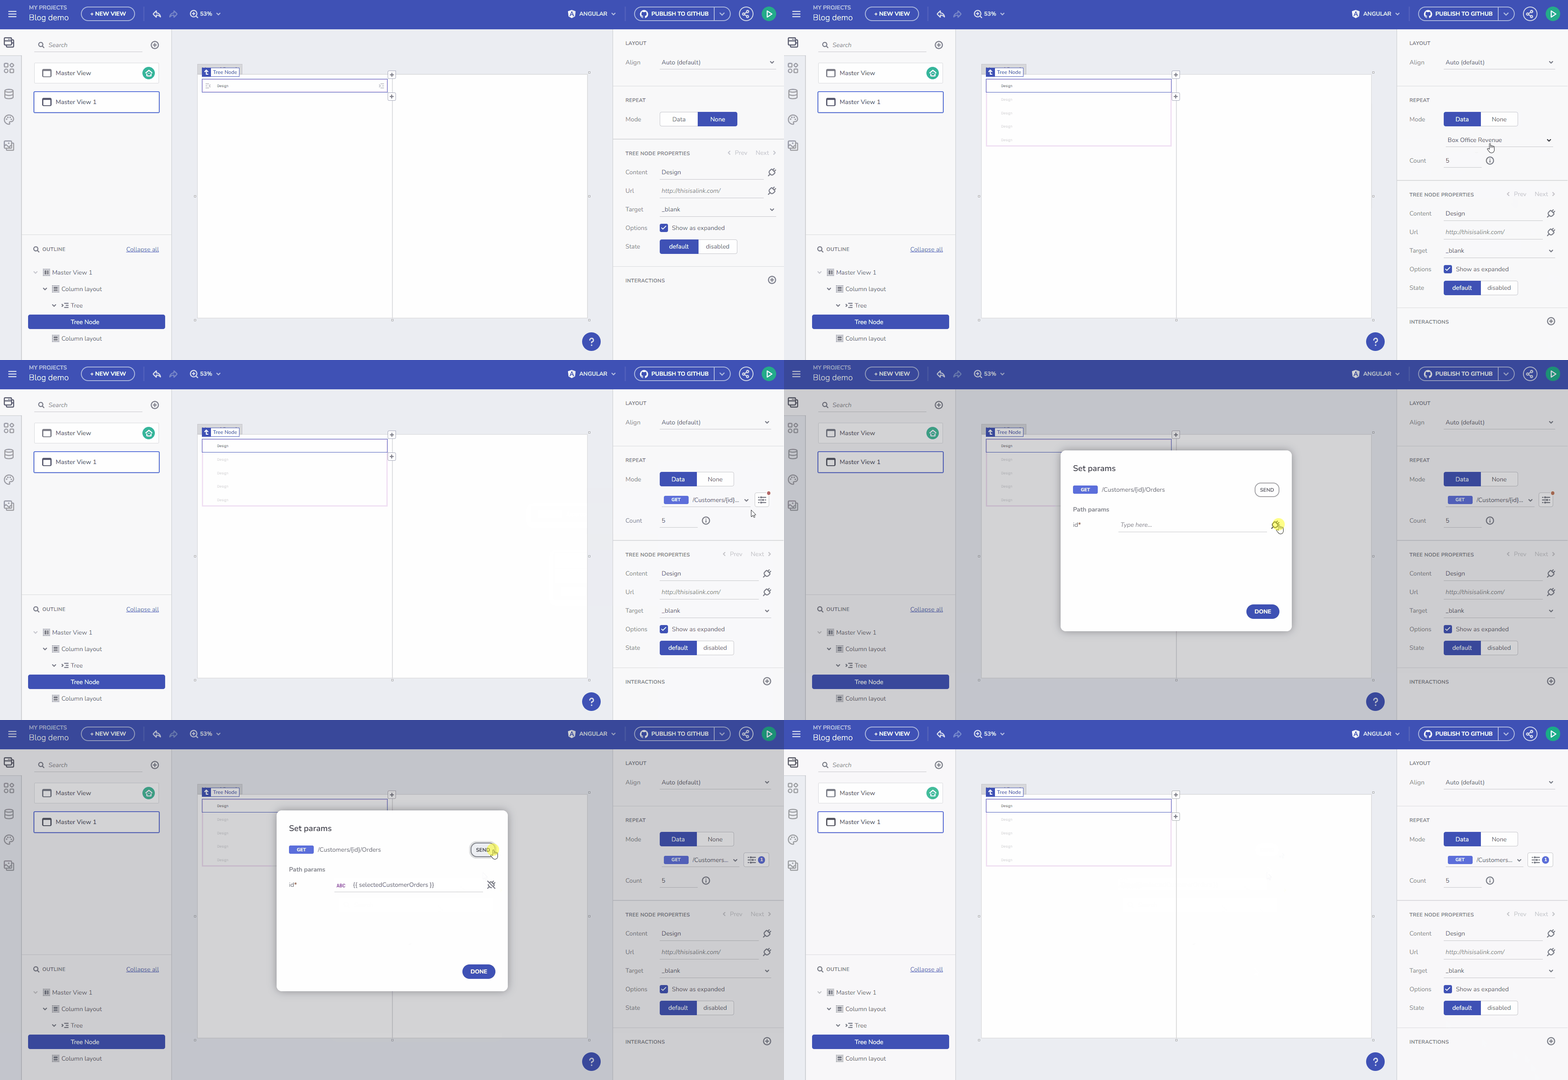
Another example would be repeating a Tree node component through Orders collection fetched based on selected Customer ID. Observe the difference, now we bind it to a Data repeat context.
4. Working with events
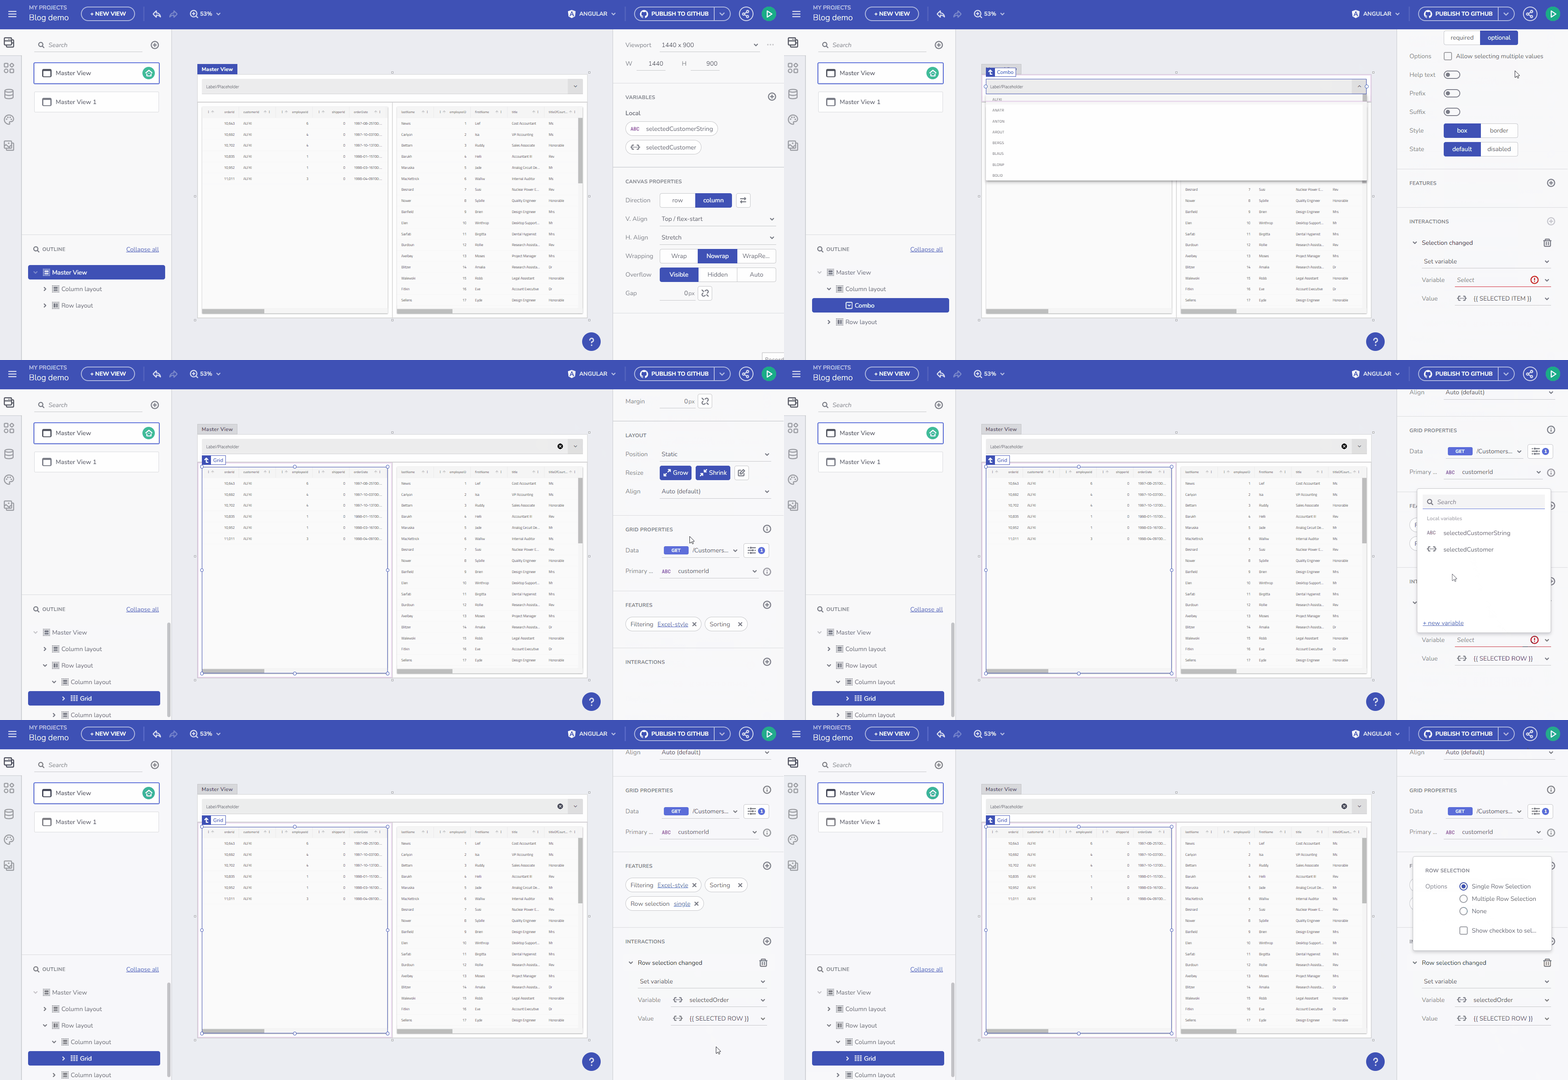
Currently, we expose component event handlers that can be used in the context of Variable management. Such events are:
- Selection changed event – for the Combo component
- Row selection changed event – for the Grid component.
- Click event – Data context for Set Variable with Click event (all existing components in the toolbox).
Grid and Combo components expose a way to set Selection modes. We dynamically change the Variable type based on the selection mode.
Here’s an example: a Combo component bound to an Array of Customers with a Single selection mode will pass a Customer Object through the Event context for the selected Item.
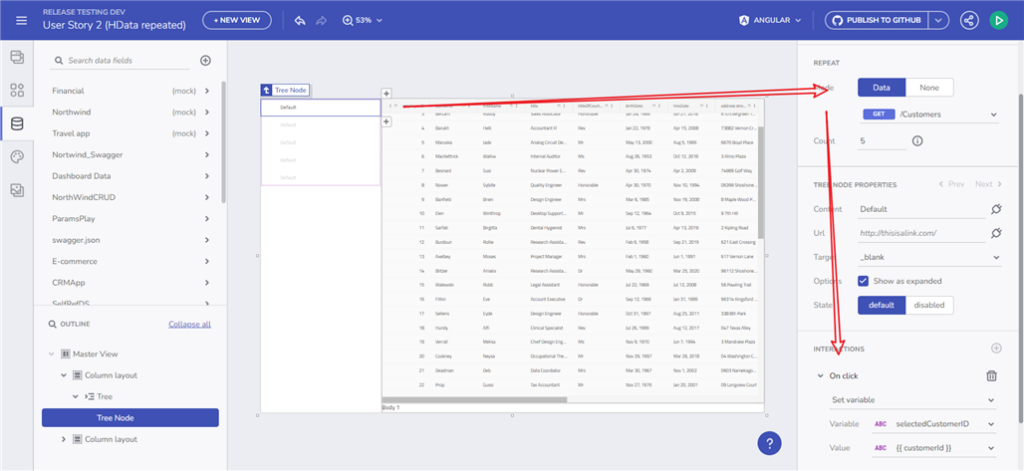
Every component part of the App Builder has an OnClick event handler that can be used in the context of a Variable. In the case of the Select item, if there is repeated data bound to it, you can access the Data Context for a particular item through the On Click -> Set variable action and use it to modify a Variable value. Example with a tree below:
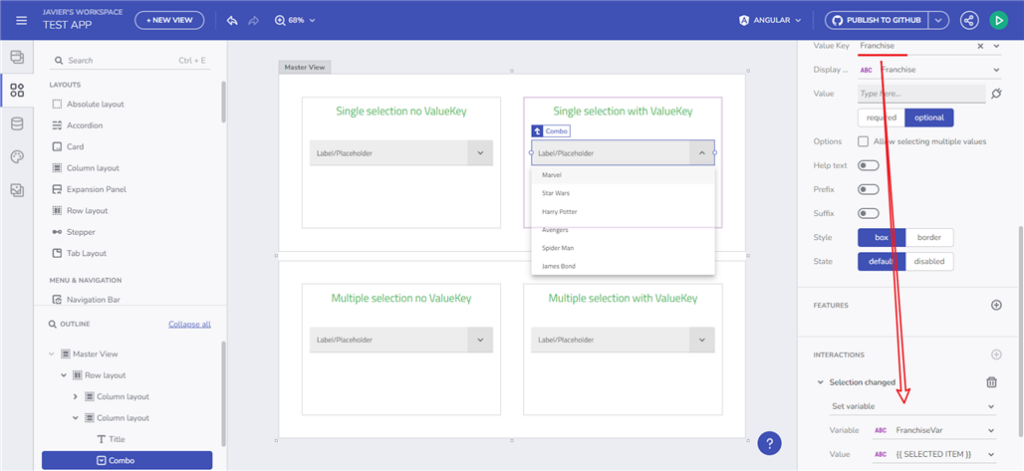
A note for Combo usage with `valueKey` set. The way combo works is to pass a primitive value on the Selection changed event. If, for example, a CustomerID of type Number is set, the event arguments will pass the CustomerID. If CustomerName is set, it will pass a string.
5. Step-by-step examples
Below, you can find real use cases for two scenarios. These scenarios will cover everything that we’ve talked about above.
Here you can check the Live Preview of the Application.
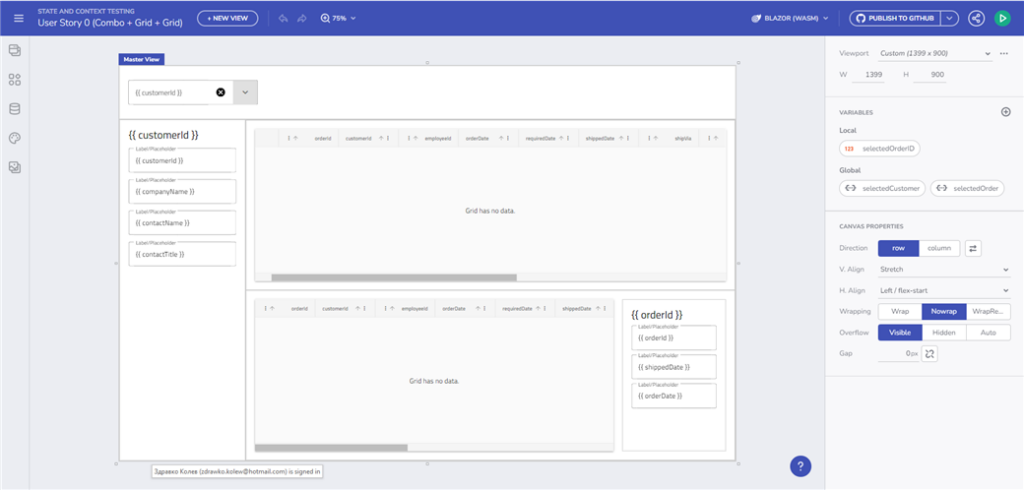
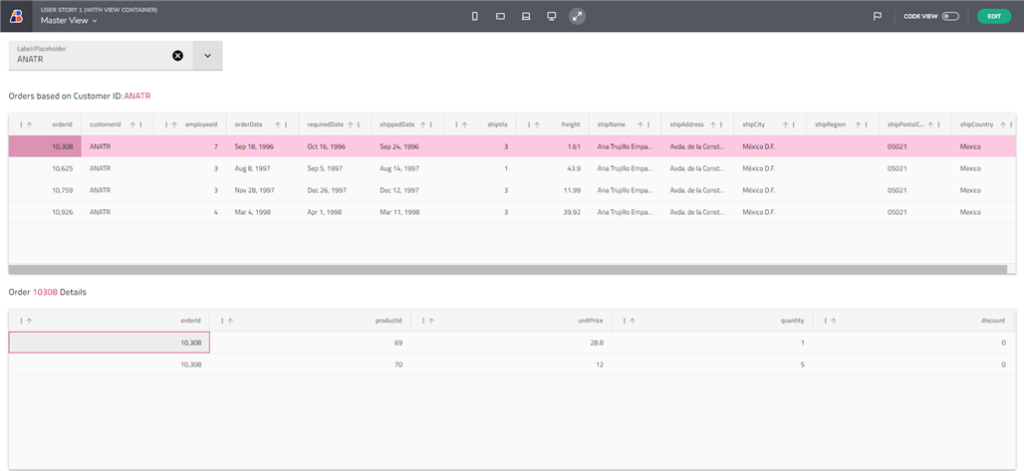
Global variable set from one View and Updating Grid request from another View through a Views container.
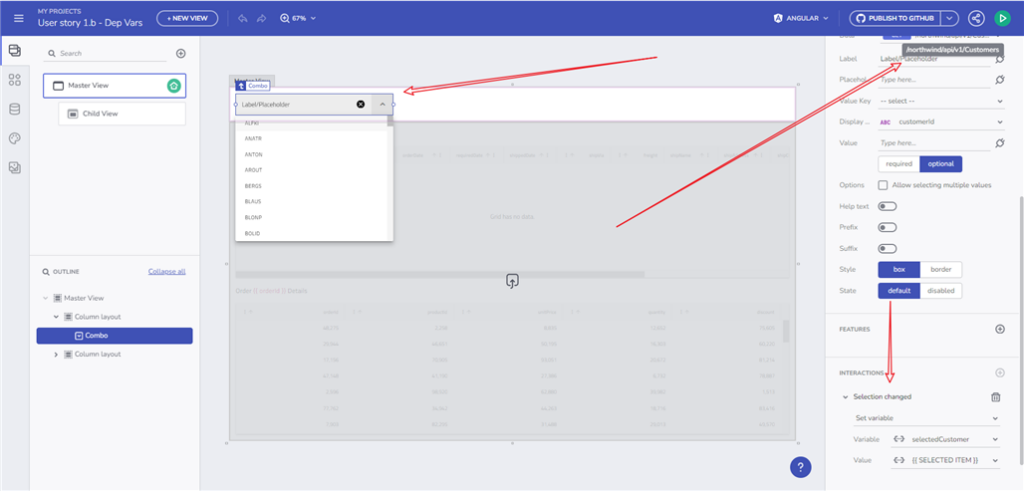
- Add a Global variable which is set upon the Combo selection change event. The combo is bound to the Customer endpoint
- Pick a CustomerID from the Combo
- Go to the other view, where the Grid is bound to an API request fetching orders based on that CustomerID
- The Grid should be updated with the selected CustomerID (from the Combo)
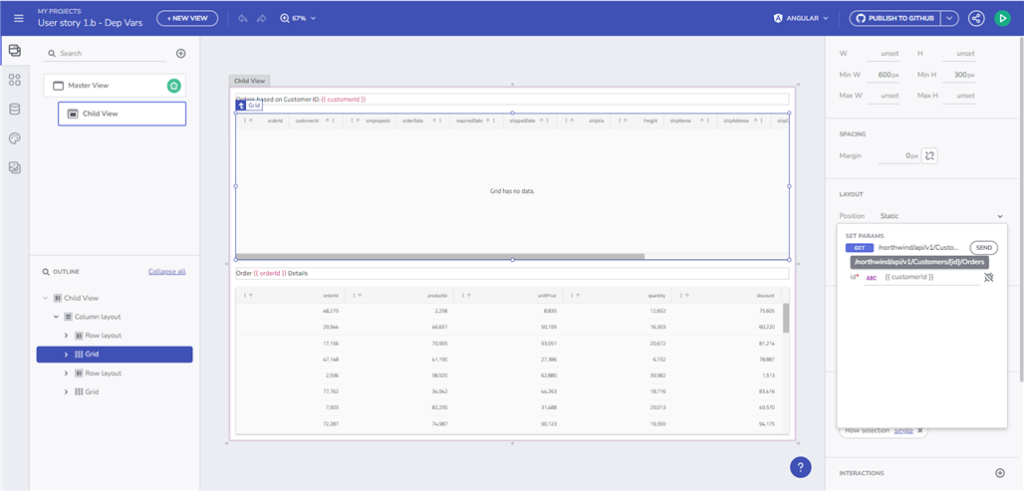
- Upon clicking on Order from the Orders grid, load another Grid with OrderDetails
- Result
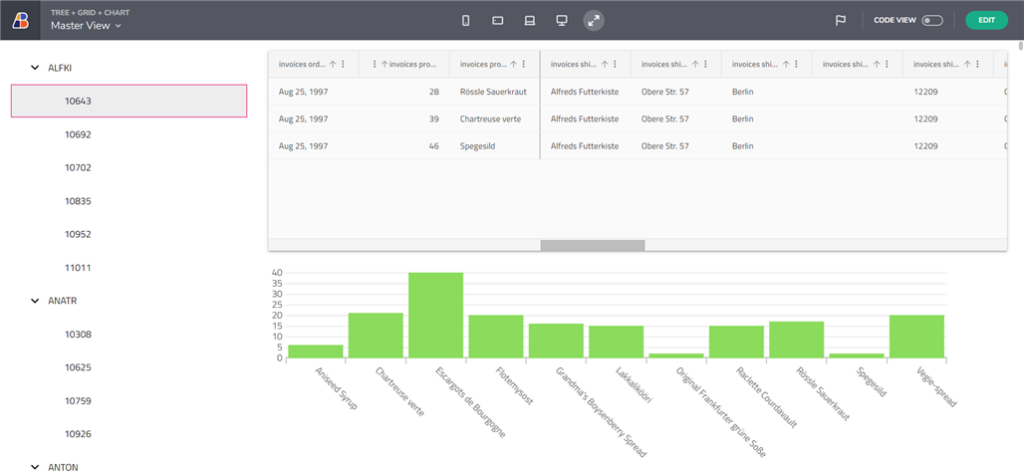
Tree bound to Hierarchical data source loading data for Grid and Chart
Here you can check the Live Preview of the Application.
- Add a Tree component and bind its parent to a Hierarchical data source (Repeated data context).
- Bind the parent tree node On Click event to a Set variable action that stores the CustomerID – String variable
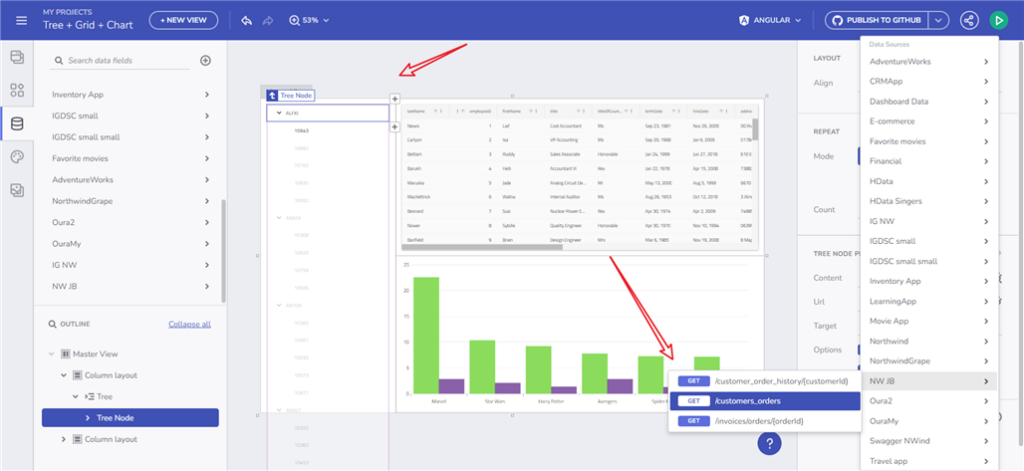
- Add a Tree child node and repeat to the Parent data context. Bind the child tree node On Click event to a Set variable action that stores the OrderID – Number variable
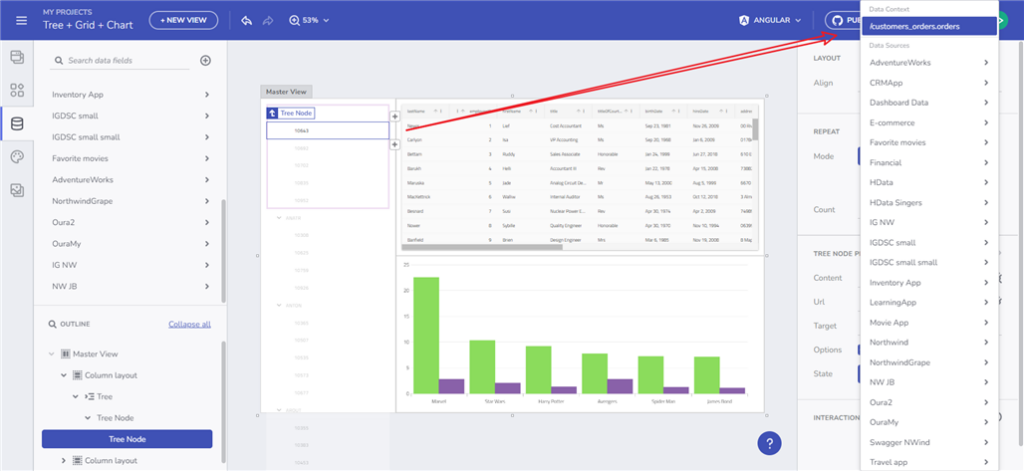
- Ensure the root tree element shows the Customer and the child tree node shows the Orders
- Bind a Grid to an endpoint that fetches Orders based on the OrderID variable as a query param
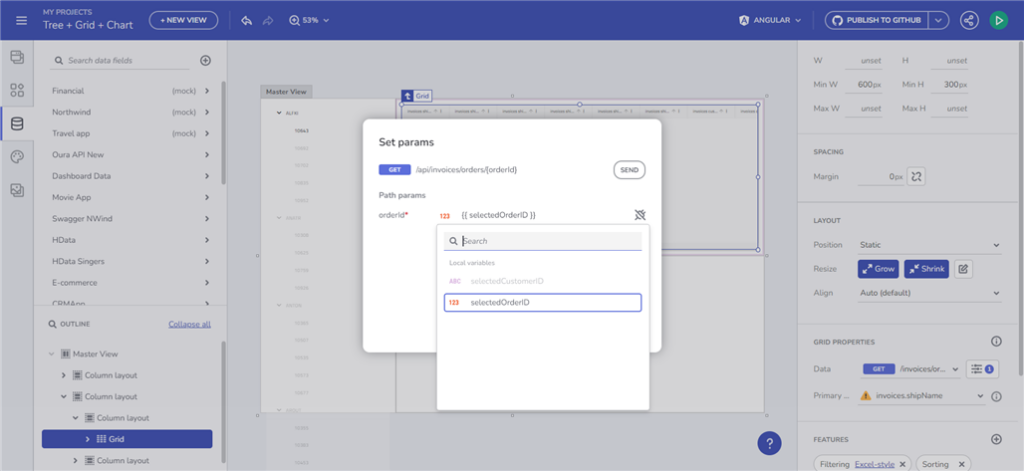
- Bind the Chart to an endpoint that fetches Customers based on the CustomerID variable as a query param
- Result
Interesting Articles
Check out the list of articles that we’ve been working on lately:
- Convert Figma designs to HTML code with App Builder
- Angular code generation with App Builder
- Reduce Complexity of Mission Critical Enterprise Software with Low-code tools
- What is Rapid Application Development
- Design-to-code Solutions Explained
- UI Component Libraries – Build vs Buy
- Grid CRUD actions, nested data-binding support, Category Chart Aggregations
Wrap Up!
As you can see, there are tons of new features and updates with the Infragistics Ultimate Q4 Release that will significantly improve, streamline, and modernize how you build beauty and simplicity, one app at a time.
We have details for each piece of this release and you can check them out here:
- Angular – Changelog & Updates
- App Builder – Change Log & What’s New
If you need more details, we encourage you to check out our:
To experience everything, visit your customer portal and get the latest version. As usual, we are always excited to get your feedback and hear what you want to add or recommend. So please email me at zkolev@infragistics.com and let me know how we can help you continue delivering value to your customers with Infragistics.


