
How To Create an App in App Builder Using Role-Based API?
In this step-by-step guide we will show you the way for crafting a fully functional and customizable app. For the purpose of the article, we will use low code and role-based API.
In this exciting tutorial, we will take your skills to the next level by combining two powerful tools – the API we built in our previous tutorial and the App BuilderTM platform. By doing so, we will create a fully functional and customizable application that can be used on a variety of platforms.
App Builder is a powerful tool that allows users to create robust applications with minimal coding experience. With its user-friendly interface, you can easily drag and drop different elements to create a polished and professional-looking application in no time and generate the code for it in Angular, Blazor, or Web Components.
Creating Your First Application in Low-Code App Builder
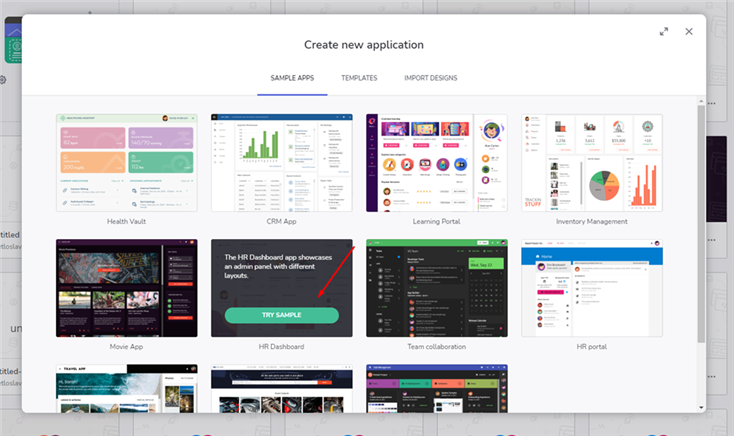
To begin, launch App Builder and select “Create New Application.” Next, navigate to the “Sample Apps” section and choose the HR Dashboard as the base design for your project. From there, you can extend and customize the design to suit your specific needs.
Upon opening the sample, you will notice that several pages have already been created for you. However, to better fit our project’s requirements, you will need to make modifications to some of these pages and create new ones as well.
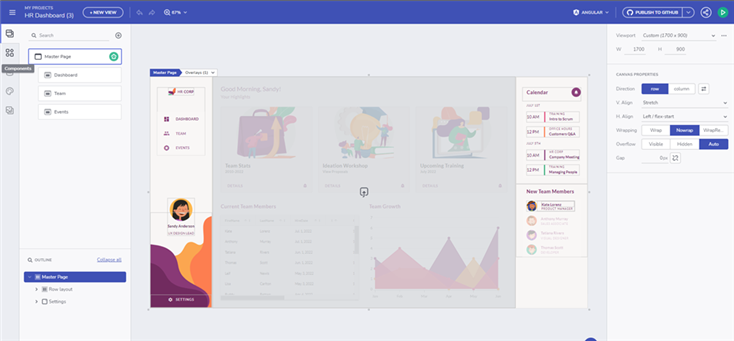
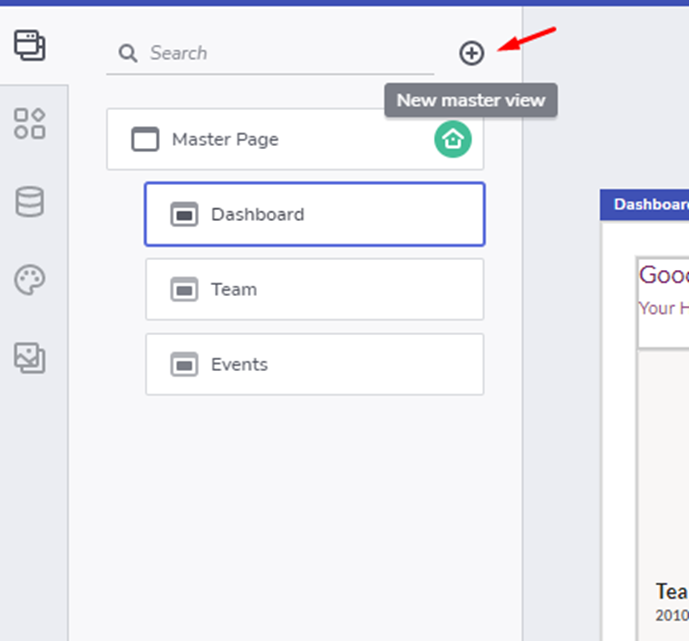
Now, let’s create the login and register pages. Navigate to the “Views” tab and select the plus icon to create a new page which we will name “Register Page.”
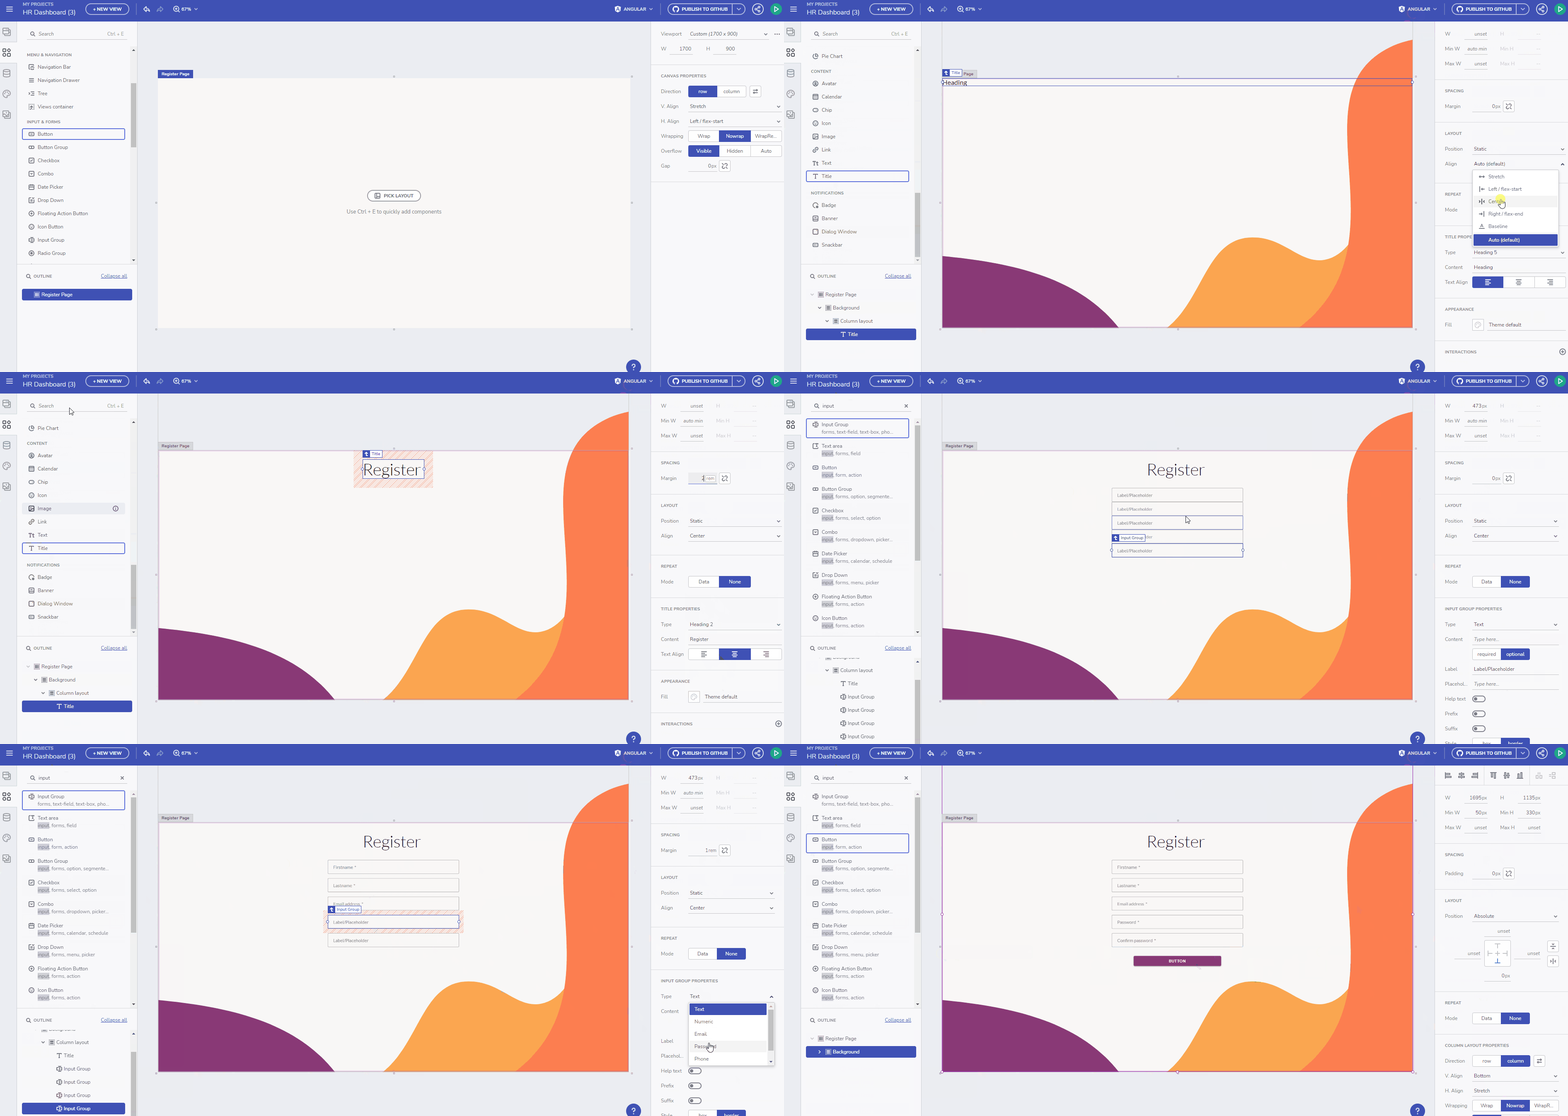
To maintain consistency, we can reuse the background of the Master page for the Register page as well. We’ll need to add a column layout. Within this layout, we’ll include a title with the Register content and five input fields along with a button. It’s important to note that all input fields should be required and should have the appropriate type specified.
Next, we can create the Login screen. This screen will only require two input fields – one for email and one for password. To simplify the process, we can duplicate the Register page and remove any unnecessary elements.
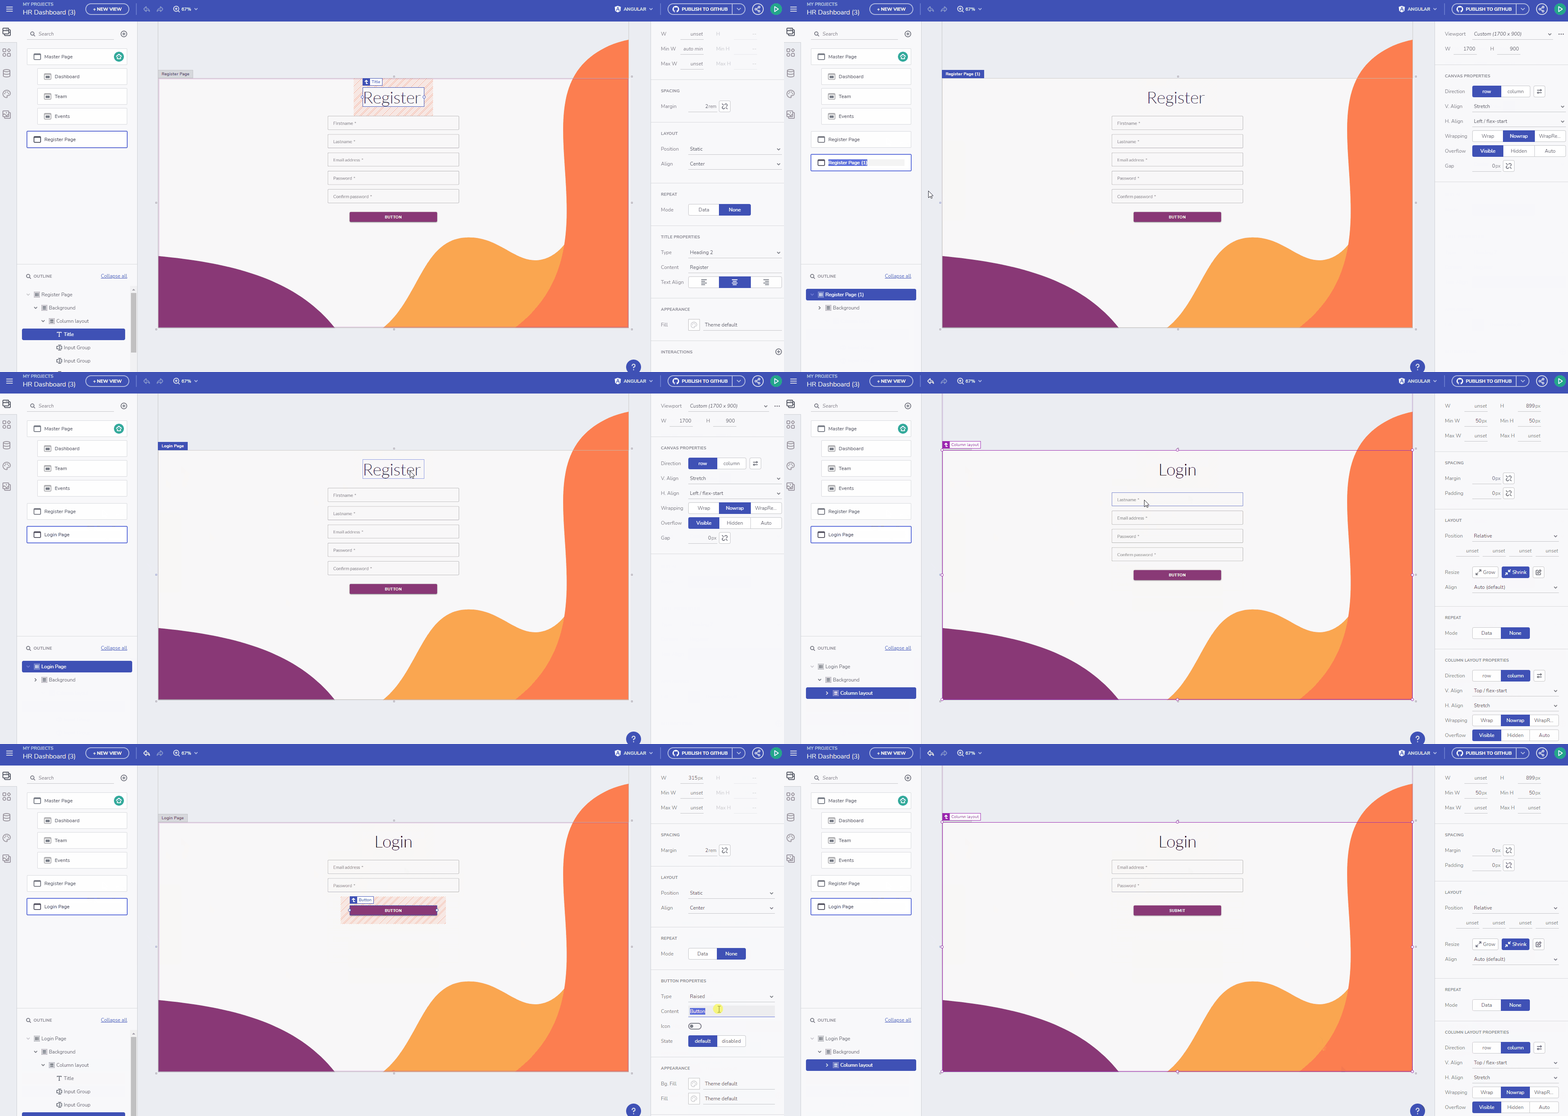
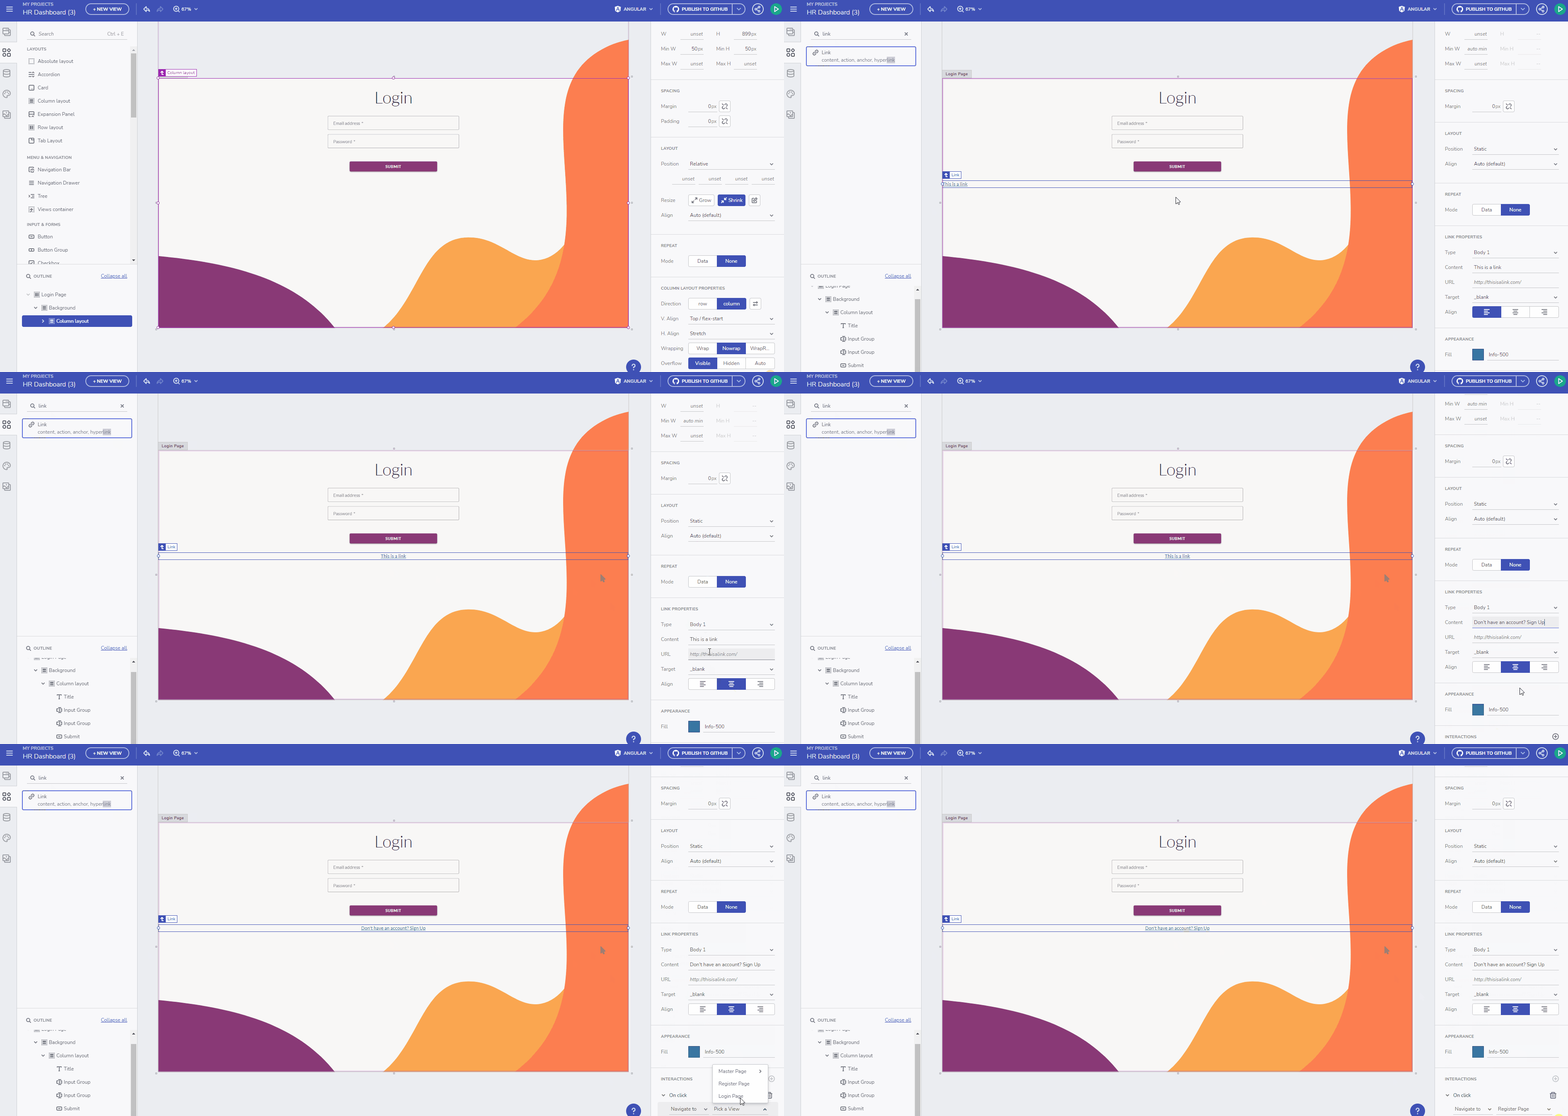
Once both pages have been created, we can add links to each page under the submit buttons.
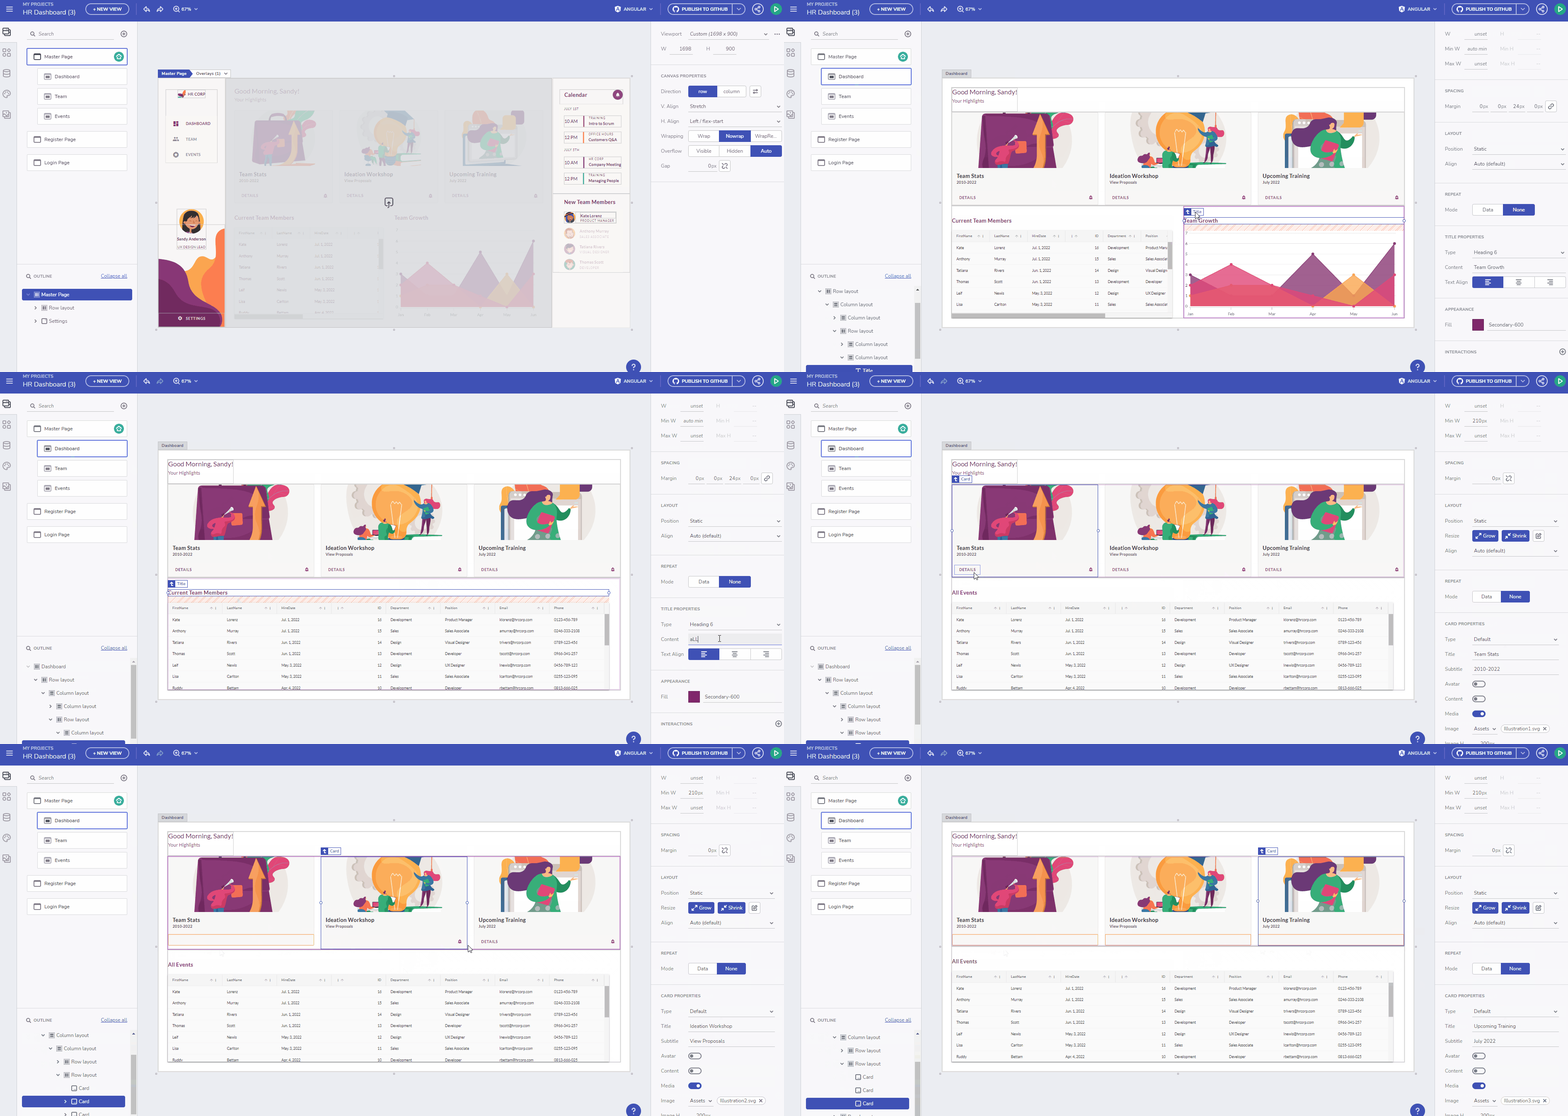
The home page will feature the dashboard, which will display all events that the current user is attending in card components. If the user has an Administrator role, they will also see a grid with all the events on the platform, allowing them to perform CRUD operations as needed.
Moving forward, we will create a page for adding new events. This page will only be accessible to users with an Administrator role, but we will cover that later in the tutorial. For each event, we will require a title, category, emails of the attending users, and the date of the event.
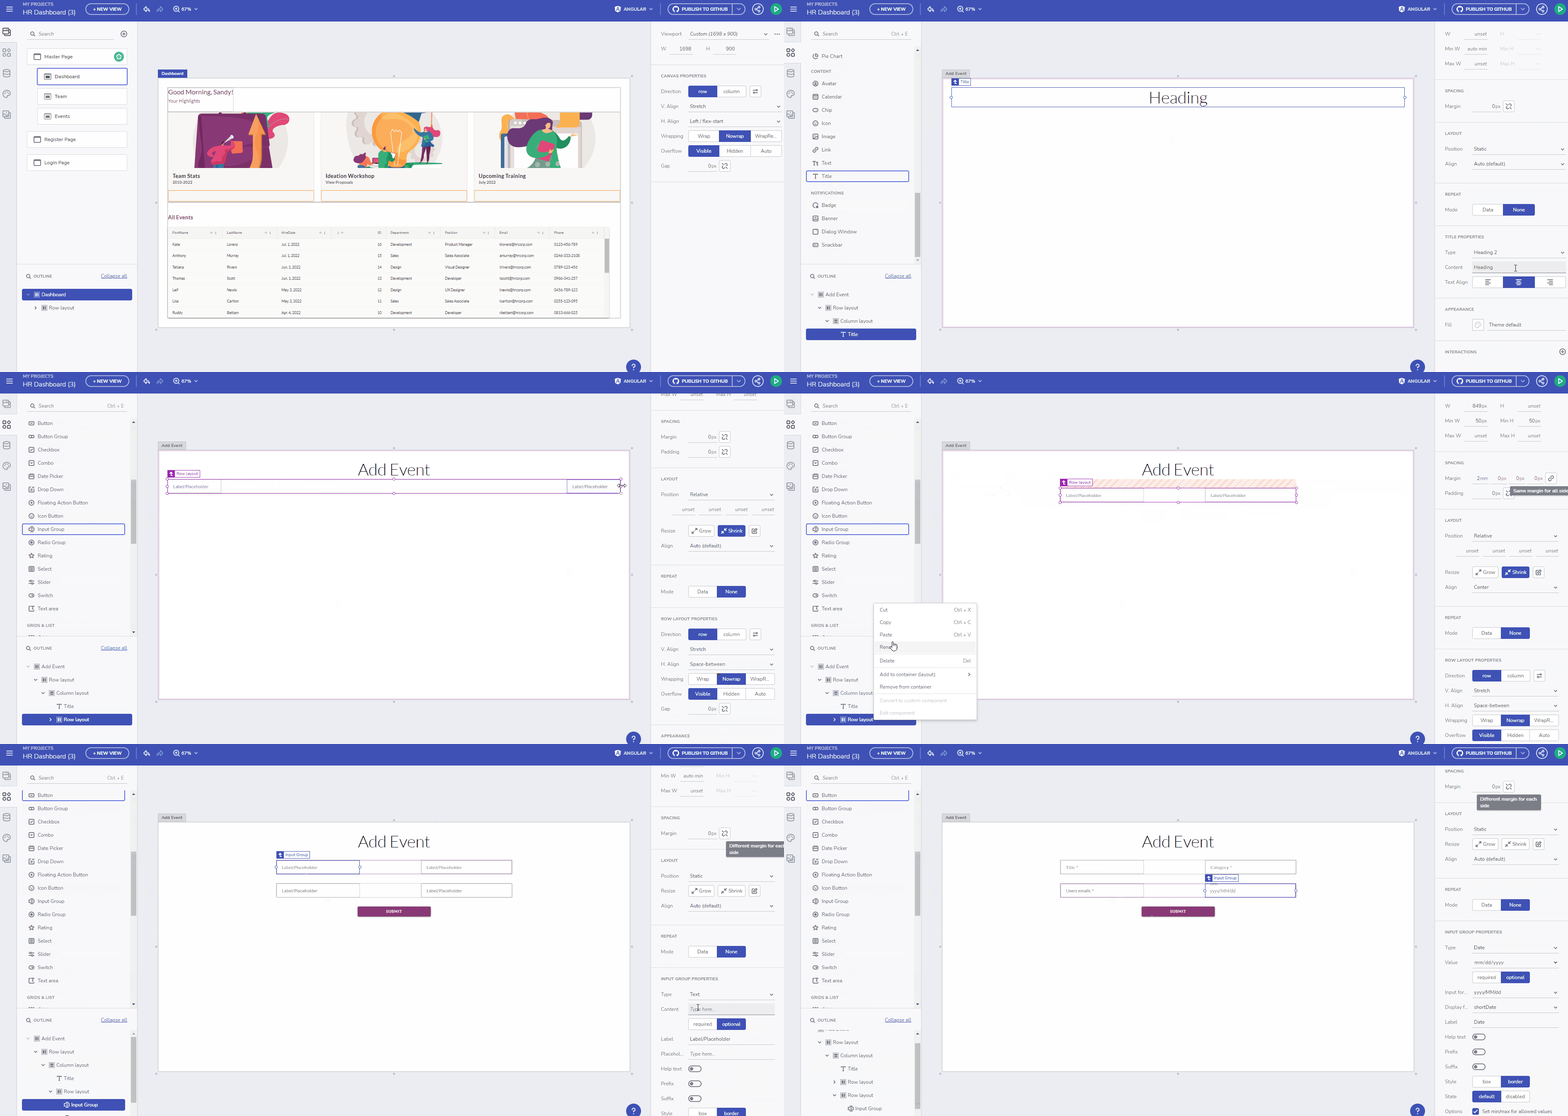
Additionally, we will need to create a similar page for changing the roles of users. Similar to the event page, this feature will only be accessible to Administrators. For the purposes of this demo, we will only support granting other users Administrator permissions.
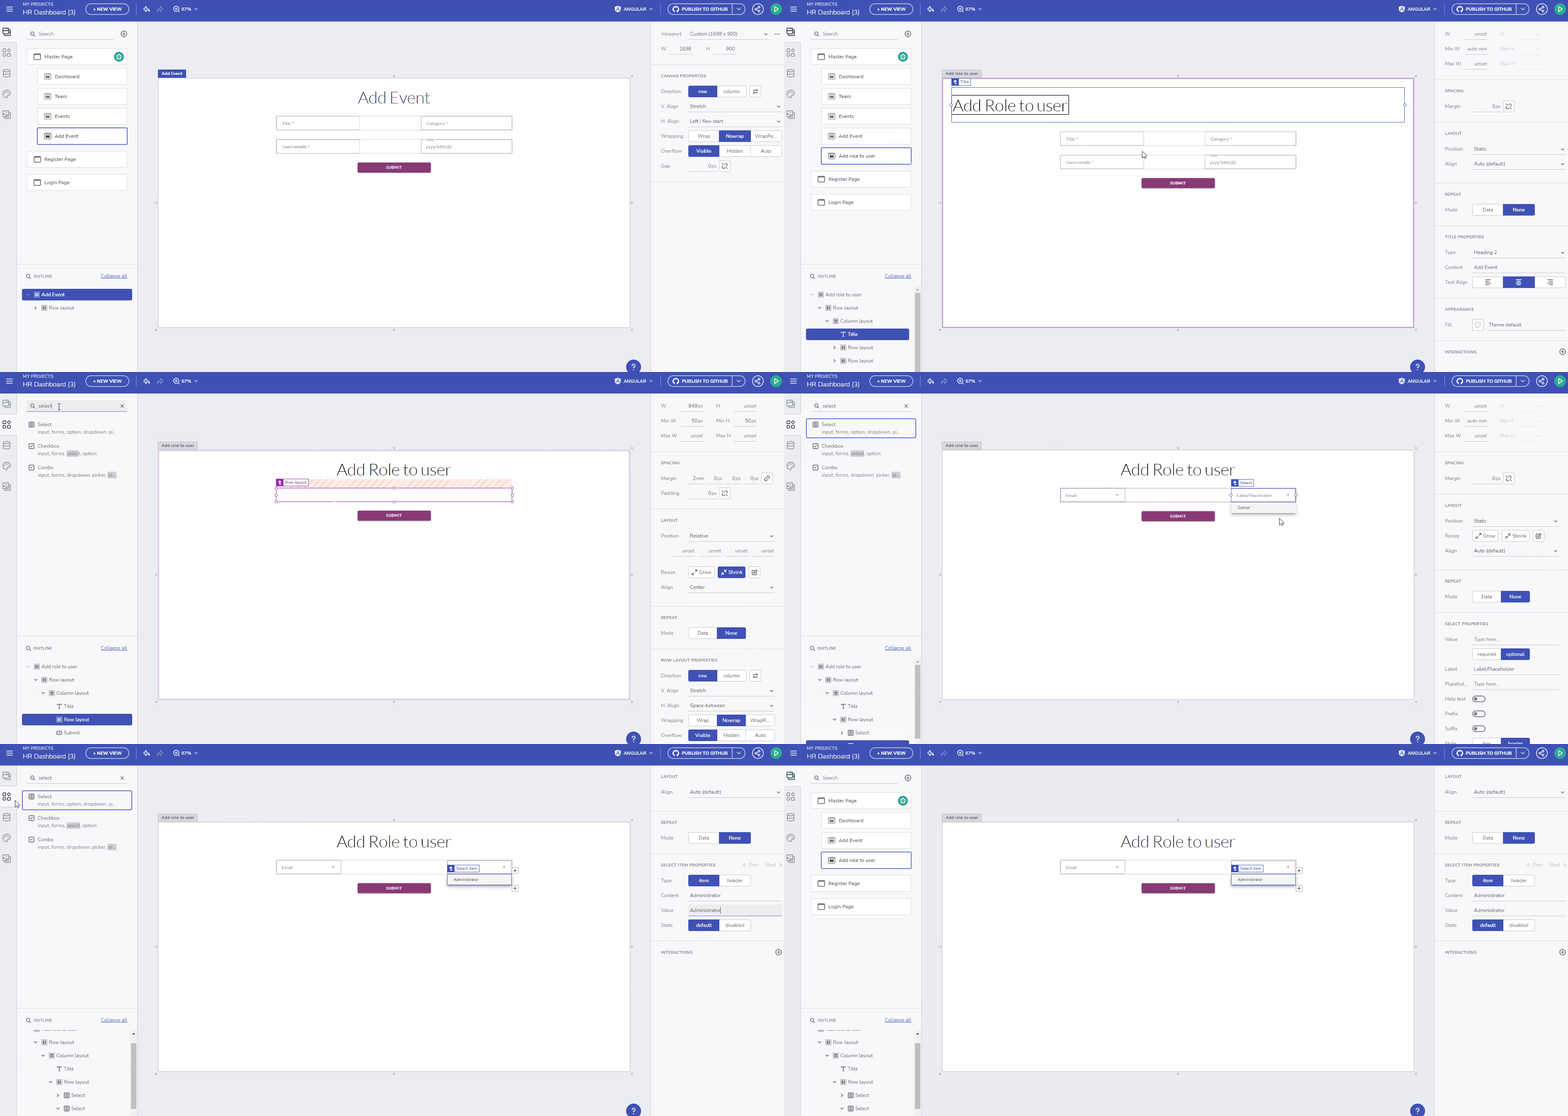
After all of our pages are created, we can link them into the sidebar navigation.
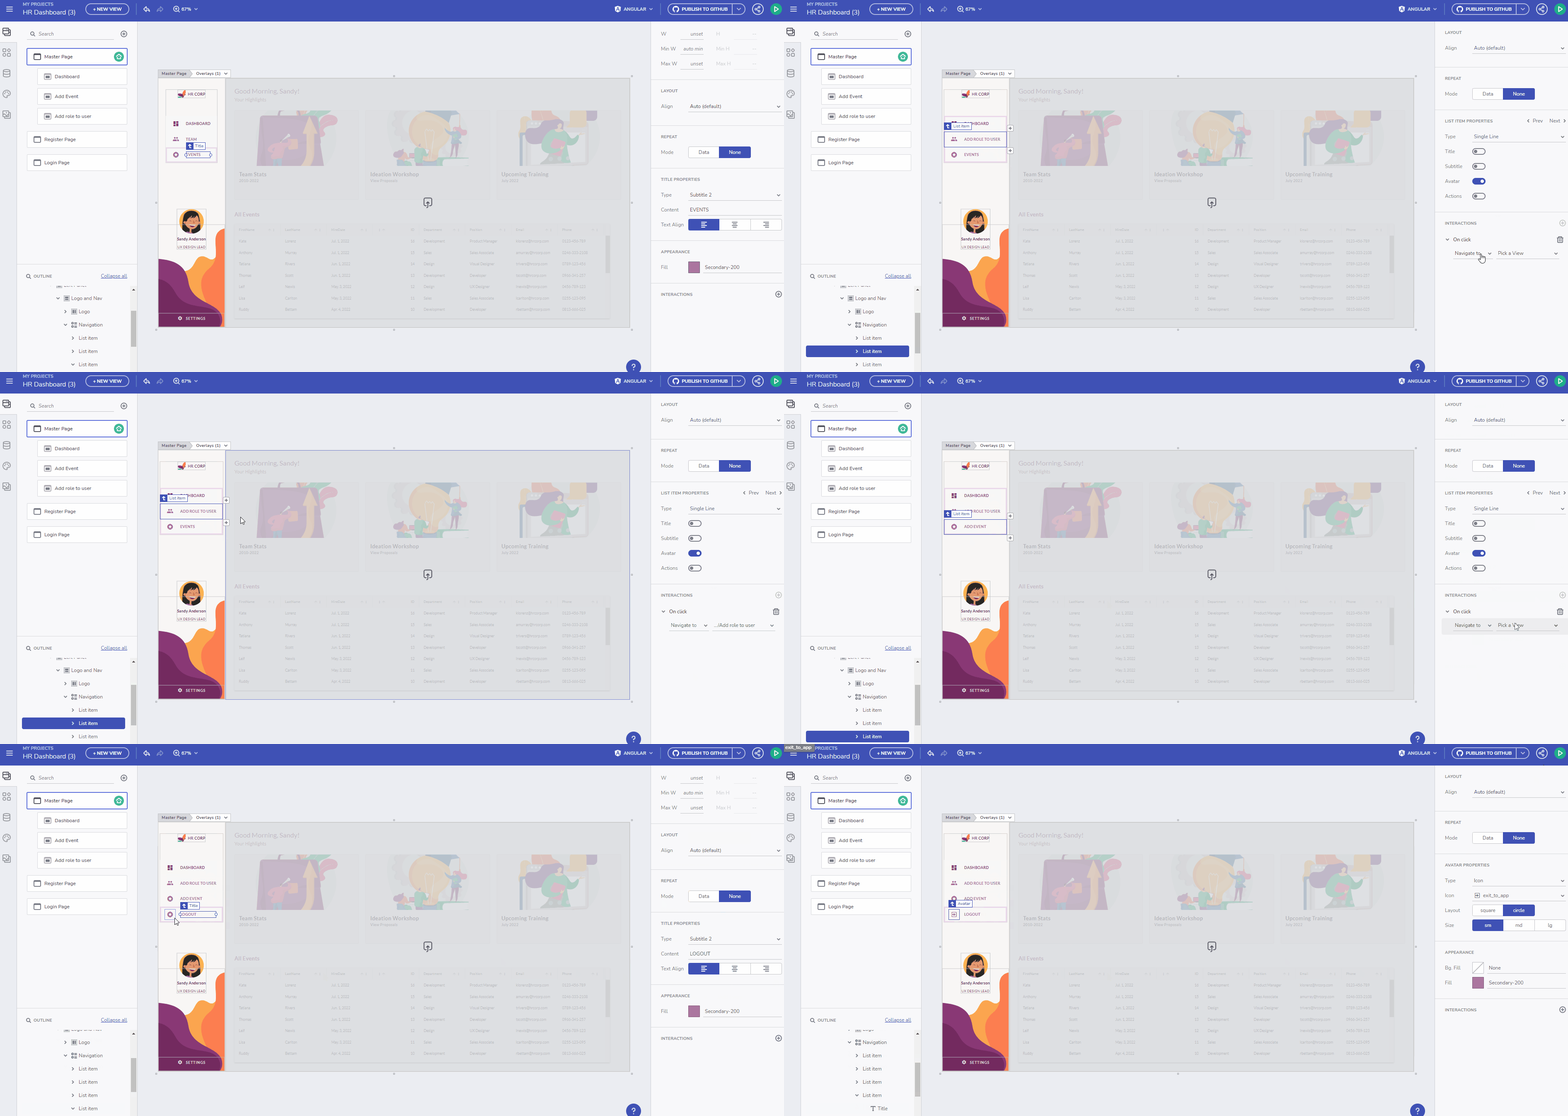
No Need To Connect The API Manually
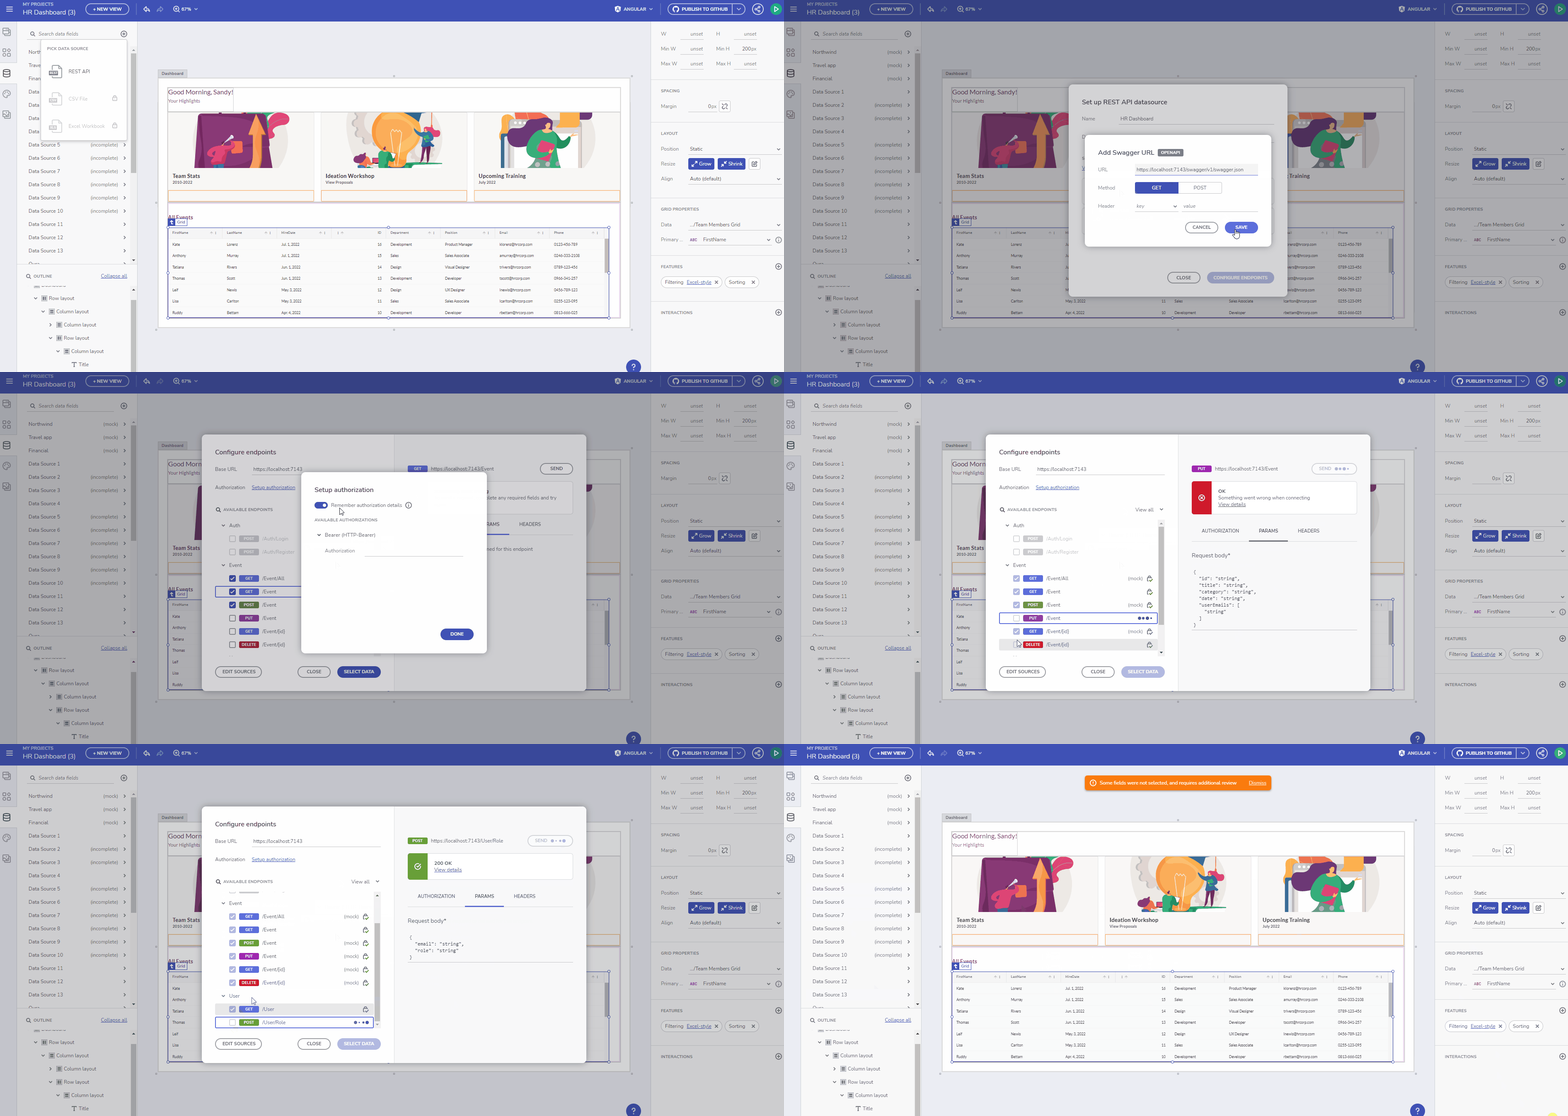
Fortunately, manually connecting our API is unnecessary as we can accomplish this directly through the App Builder by uploading it as a datasource. First, we must ensure our API is running, then navigate to the Datasources tab, select the plus icon, and choose REST API. From there, we have two options:
- To add a Swagger definition
- Or to use JSON URL
For our purposes, we will utilize the Swagger approach and add the URL.
We will need to specify a name for the datasource and proceed to the next step. Then, we must identify which endpoints we want to include. For this demo, we will select all available endpoints. However, it is important to note that all endpoints for Events require authorization to succeed. Thus, we need to obtain a JWT token from a user in the API and add it to the authorization tab.
Later in the tutorial, we will replace this with the token from the current user. Once the authorization is set, we can proceed to Select Data, ensure all fields are selected, and click Done.
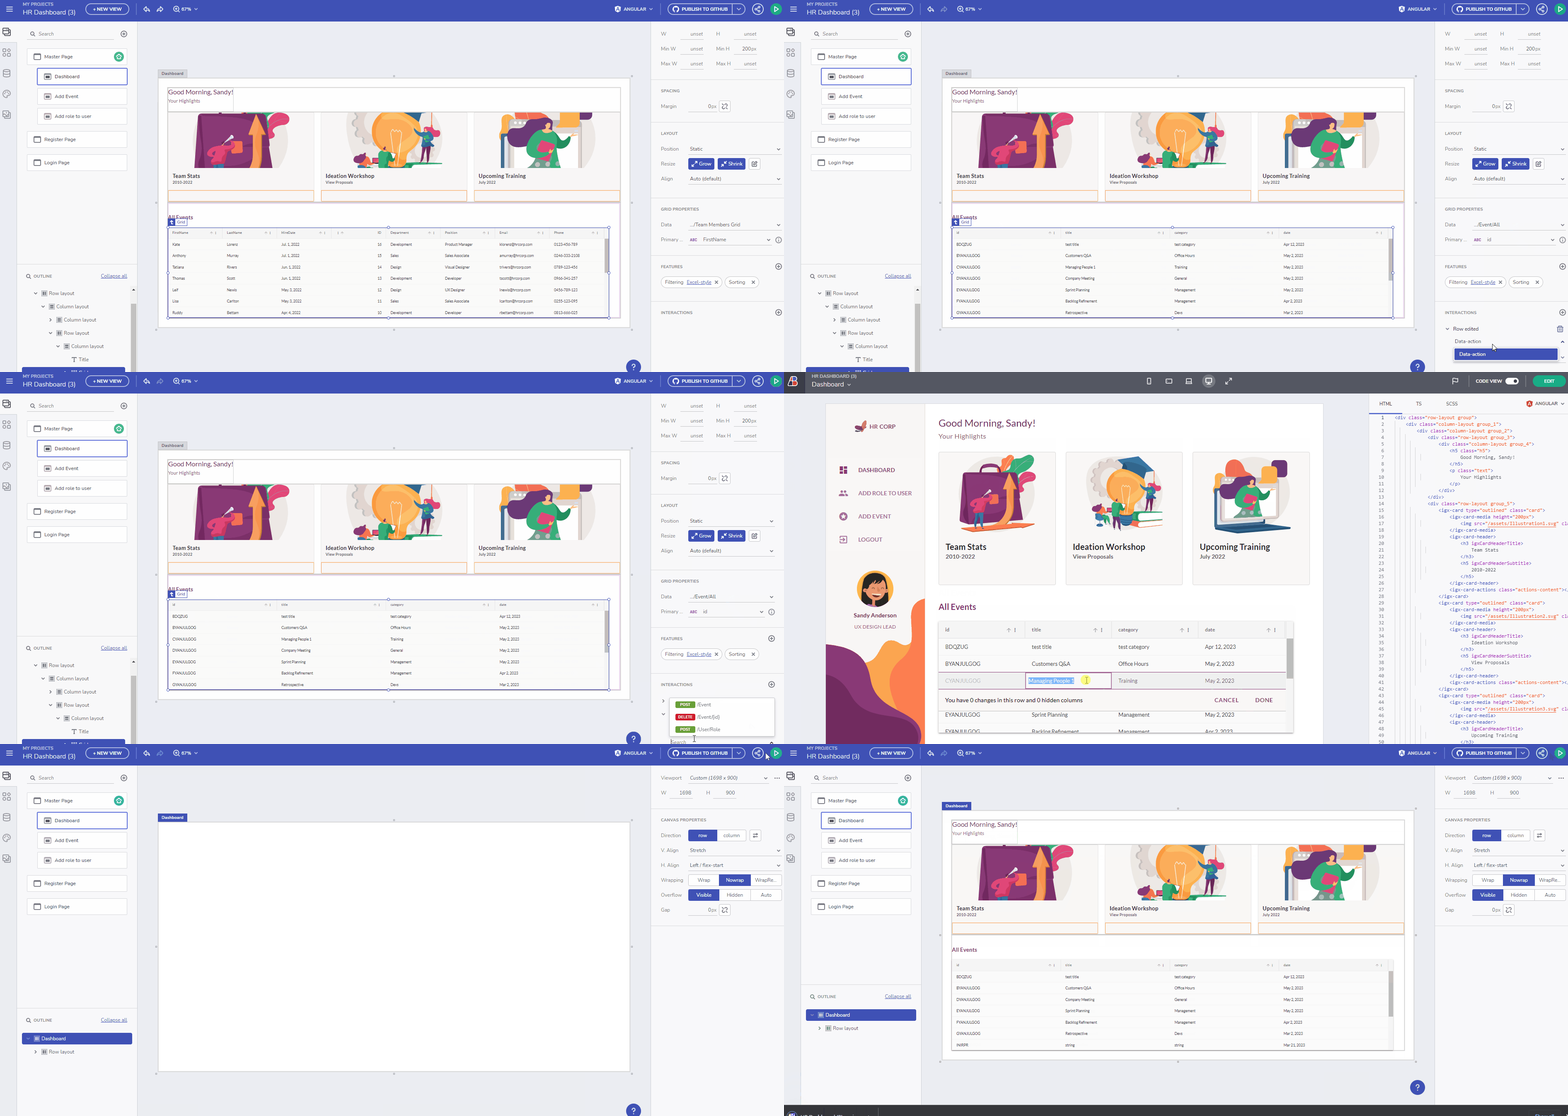
Once the datasource has been successfully uploaded, we can proceed to connect the grid on the dashboard page. First, select the grid and update the datasource from the Data field. From there, we can add update and delete operations that will be linked to the endpoints in our API, allowing for live modification of data through interactions with the grid.
Once all pages have been created, we can preview the application by selecting the green button located in the top right corner. Then we need to download the application to facilitate further customization.
Run The Created App Locally
Once the application has been downloaded, unzip the project and open it in Visual Studio Code. In the terminal, run “npm install” followed by “npm run start” to start running the application.
The next step is to connect the login and register pages with our API. To achieve this, we must add functions that will call the API. These functions should be added to the services/hrdashboard.service.ts file where all of our services are stored. We must add two more functions, one for login and one for register.
…
public registerUser(data: any, contentType: string = 'application/json-patch+json, application/json, text/json, application/*+json') {
    const options = {
    headers: {
        'content-type': contentType
    }
};
const body = data;
    return this.http.post(`${API_ENDPOINT}/Auth/Register`, body, options);
}
  public loginUser(data: any, contentType: string = 'application/json-patch+json, application/json, text/json, application/*+json') {
    const options = {
      headers: {
        'content-type': contentType
      }
    };
    const body = data;
    return this.http.post(`${API_ENDPOINT}/Auth/Login`, body, options);
  }
…
In the next step, navigate to the register-page.component.ts file and add bindings for the input properties. Create a variable to store error messages and show validations to the user if the request is unsuccessful. Also, add a function that will be triggered when the form is submitted. This function will check if all fields are required and if so, store the JWT token in localStorage and navigate to the home page. If any field is missing, the function should display an error message to the user.
export class RegisterPageComponent {
  email: number;
  firstName: string;
  lastName: string;
  password: string;
  confirmedPassword: string;
  errorMessage: string;

  constructor(
    private hRAPIService: HRAPIService,
    private router: Router
  ) { }
  onSubmit(event) {
    event.preventDefault();
    if (this.password !== this.confirmedPassword) {
      this.errorMessage = 'Passwords should match!'
    }
    else if (this.email && this.firstName && this.lastName && this.password) {
      this.hRAPIService.registerUser({ firstName: this.firstName, lastName: this.lastName, email: this.email, password: this.password, confirmedPassword: this.confirmedPassword })
      .subscribe({
        next: (response) => {
          localStorage.setItem('hr_app_token', response['value']);
          this.router.navigateByUrl('/');
        },
        error: (error) => {
          console.log(error)
          this.errorMessage = error.error["errors"] ? Object.values(error.error["errors"])[0] as string : error.error;
        }
      });
    }
    else {
      this.errorMessage = "All fields are required!";
    }
  }
}
We also need to update register-page.component.html to bind the inputs.
<div class="column-layout background"></div>
<div class="column-layout group">
    <h2 class="h2">
            Register
    </h2>
    <p class="error-message">{{errorMessage}}</p>
    <igx-input-group type="border" class="input">
            <input type="text" required igxInput [(ngModel)]="firstName"/>
            <label igxLabel>FirstName</label>
    </igx-input-group>
    <igx-input-group type="border" class="input_1">
            <input type="text" required igxInput [(ngModel)]="lastName"/>
            <label igxLabel>Lastname</label>
    </igx-input-group>
    <igx-input-group type="border" class="input_1">
            <input type="email" required igxInput [(ngModel)]="email"/>
            <label igxLabel>Email</label>
    </igx-input-group>
    <igx-input-group type="border" class="input_1">
            <input type="password" required igxInput [(ngModel)]="password"/>
            <label igxLabel>Password</label>
    </igx-input-group>
    <igx-input-group type="border" class="input_1">
            <input type="password" required igxInput [(ngModel)]="confirmedPassword"/>
            <label igxLabel>Confirm password</label>
    </igx-input-group>
      <button (click)="onSubmit($event)" igxButton="raised" igxRipple class="button">
        Register
      </button>
</div>
To style the errorMessage we need to add the styles in the register-page.component.scss.
.error-message {
  text-align: center;
  margin: 2rem 0;
  font-weight: bold;
  color: red;
}
Like the register page, we need to create properties to bind the inputs and a function that is executed when the form is submitted for the login page. This function will call the login service to authenticate the user by sending their email and password. If the authentication is successful, it will store the jwt token in the localStorage and navigate to the home page. If it fails, it will display an error message to the user. We also need to update the login-page.component.html to bind the inputs.
login.page.component.ts
export class LoginComponent {
  email: number;
  firstName: string;
  lastName: string;
  password: string;
  confirmedPassword: string;
  errorMessage: string;

  constructor(
    private hRAPIService: HRAPIService,
    private router: Router
  ) { }
  onSubmit(event) {
    event.preventDefault();
    if (this.email && this.password) {
      this.hRAPIService.loginUser({ email: this.email, password: this.password })
        .subscribe({
          next: (response) => {
            localStorage.setItem('hr_app_token', response['value']);
            this.router.navigateByUrl('/');
          },
          error: (error) => {
            console.log(error)
            this.errorMessage = error.error["errors"] ? Object.values(error.error["errors"])[0] as string : error.error;
          }
        });
    }
    else {
      this.errorMessage = "All fields are required!";
    }
  }
}
login-page.component.html
<div class="column-layout background"></div>
<div class="column-layout group">
    <h2 class="h2">
            Login
    </h2>
    <p class="error-message">{{errorMessage}}</p>
    <igx-input-group type="border" class="input">
            <input type="text" igxInput [(ngModel)]="email"/>
            <label igxLabel>Email</label>
    </igx-input-group>
    <igx-input-group type="border" class="input_1">
            <input type="password" igxInput [(ngModel)]="password"/>
            <label igxLabel>Password</label>
    </igx-input-group>
      <button (click)="onSubmit($event)" igxButton="raised" igxRipple class="button">
        Login
      </button>
</div>
We need to create an AuthService which will help us decode the token, check if the user has certain role, and remove the session. To do so, we will create a new file named auth.service.ts, which we should import into the app.module.ts. In order to decode the tokens, we need to install the jwt-decode package.
import { Injectable } from "@angular/core";
import jwt_decode from 'jwt-decode
';
type Token = {
    Id?: string,
    email?: string,
    firstName?: string,
    exp?: number,
    role?: string,
    sub?: string,
}
@Injectable({
    providedIn: 'root'
  })
  export class AuthService {
    decodeToken(token) {
        return jwt_decode(token);
    }
    getEmail() {
        const token = localStorage.getItem('hr_app_token');
        const {email}: Token = this.decodeToken(token);
        return email;
    }
    isAuthenticated() {
        const token = localStorage.getItem('hr_app_token');
        if (token) {
            const {email, role}: Token = this.decodeToken(token);
            return email != null && role != null;
        }
        return false;
    }
    isAdmin() {
        const token = localStorage.getItem('hr_app_token');
        const {role}: Token = this.decodeToken(token);
        return this.isAuthenticated() && role === "Administrator";
    }
    logout() {
        localStorage.removeItem('hr_app_token');
    }
}
Implementing Guards For Endpoints For Better Security
To enhance security, we need to implement guards for our endpoints. We will create three guards, starting with the anonymous-guard.ts. This guard ensures that the login and register pages are only accessible to users who are not logged in. If a user who is already logged in tries to access these pages, they should be redirected to the home page.
To implement this guard, we will create a guards folder within the app directory and create a new file called anonymous-guard.ts.
import { Injectable } from '@angular/core';
import { CanActivate, ActivatedRouteSnapshot, RouterStateSnapshot, Router, UrlTree } from '@angular/router';
import { Observable } from 'rxjs';
import { AuthService } from '../services/auth.service';

@Injectable({
    providedIn: 'root'
})
export class AnonymousGuard implements CanActivate {
    constructor(private router: Router,
        private authService: AuthService) { }
    canActivate(
        next: ActivatedRouteSnapshot,
        state: RouterStateSnapshot): Observable
<boolean | UrlTree>
| Promise
<boolean | UrlTree>
| boolean | UrlTree {
        if (!this.authService.isAuthenticated()) {
            return true;
        }
        return this.router.parseUrl("/");
    }
}
The next guard we need to implement is called auth-guard. This guard will ensure that certain pages are only accessible to authenticated users.
import { Injectable } from '@angular/core';
import { CanActivate, ActivatedRouteSnapshot, RouterStateSnapshot, Router, UrlTree } from '@angular/router';
import { Observable } from 'rxjs';
import { AuthService } from '../services/auth.service';
@Injectable({
    providedIn: 'root'
})
export class AuthGuard implements CanActivate {
    constructor(private router: Router,
        private authService: AuthService) { }
    canActivate(
        next: ActivatedRouteSnapshot,
        state: RouterStateSnapshot): Observable
<boolean | UrlTree>
| Promise
<boolean | UrlTree>
| boolean | UrlTree {
        if (this.authService.isAuthenticated()) {
            return true;
        }
        return this.router.parseUrl("/login-page");
    }
}
The third guard called admin-guard will restrict access to certain pages only to users with the Administrator role.
import { Injectable } from '@angular/core';
import { CanActivate, ActivatedRouteSnapshot, RouterStateSnapshot, Router, UrlTree } from '@angular/router';
import { Observable } from 'rxjs';
import { AuthService } from '../services/auth.service';

@Injectable({
    providedIn: 'root'
  })
export class AdminGuard implements CanActivate {
    constructor(private router: Router,
        private authService: AuthService) { }

    canActivate(
        next: ActivatedRouteSnapshot,
        state: RouterStateSnapshot): Observable
<boolean | UrlTree>
| Promise
<boolean | UrlTree>
| boolean | UrlTree {
        if (this.authService.isAdmin()) {
            return true;
        }
        return this.router.parseUrl("/login-page");
    }
}
Once we’ve created our guards, we need to apply them to the appropriate routes. To do this, open app-routing.module.ts and add a canActivate property to each route along with the corresponding guard.
For example, the login and register pages should only be accessible to users who aren’t already logged in, so we add AnonymousGuard to their routes. The master-page should only be accessible to authenticated users, so we add AuthGuard to that route. Finally, the add-event and add-role pages should only be accessible to users with Administrator role, so we attach AdminGuard to those routes.
export const routes: Routes = [
  { path: '', redirectTo: 'master-page', pathMatch: 'full' },
  { path: 'error', component: UncaughtErrorComponent },
  { path: 'master-page', loadChildren: () => import('./master-page/master-page.module').then(m => m.MasterPageModule), canActivate: [AuthGuard]},
  { path: 'register-page', component: RegisterPageComponent, data: { text: 'Register Page' }, canActivate: [AnonymousGuard]},
  { path: 'login-page', component: LoginPageComponent, data: { text: 'Login' }, canActivate: [AnonymousGuard]},
  { path: 'add-event', component: AddEventComponent, data: { text: 'Add Event' }, canActivate: [AdminGuard]},
  { path: 'add-role-to-user', component: AddRoleToUserComponent, data: { text: 'Add Role' }, canActivate: [AdminGuard]},
  { path: '**', component: PageNotFoundComponent } // must always be last
];
To ensure that users without permissions cannot access certain links in the navigation, we must hide them. To do this, we can add the *ngIf=”isUserAdmin()” directive to the igx-list-item elements that correspond to the ADD EVENT and ADD ROLE TO USER options in the master-page.component.html file. By doing so, we ensure that these links are only visible to users who have administrator privileges.
To implement this functionality, we will also need to update the master-page.component.ts file. We can create a function to check whether the current user is an administrator and use it in the *ngIf directive we added earlier.
Additionally, we need to create a logout function and attach it to the click event of the igx-list-item that corresponds to the LOGOUT link. This will allow users to log out of the system when necessary.
It should look like this:
…
<igx-list-item [isHeader]="false" routerLink="/master-page/add-role-to-user" *ngIf="isUserAdmin()">
<span igxListThumbnail>
    <igx-avatar icon="people" [roundShape]="true" class="avatar_1"></igx-avatar>
</span>
<span igxListLine>
    <p class="ig-typography__subtitle-2 text_3">
              ADD ROLE TO USER
    </p>
</span>
</igx-list-item>
<igx-list-item [isHeader]="false" routerLink="/master-page/add-event" *ngIf="isUserAdmin()">
<span igxListThumbnail>
    <igx-avatar icon="stars" [roundShape]="true" class="avatar_1"></igx-avatar>
</span>
<span igxListLine>
    <p class="ig-typography__subtitle-2 text_3">
              ADD EVENT
    </p>
</span>
</igx-list-item>
<igx-list-item [isHeader]="false" (click)="logout()">
<span igxListThumbnail>
    <igx-avatar icon="exit_to_app" [roundShape]="true" class="avatar_1"></igx-avatar>
</span>
<span igxListLine>
    <p class="ig-typography__subtitle-2 text_3">
              LOGOUT
    </p>
</span>
</igx-list-item>
…
export class MasterPageComponent {
  public listItemVisible = false;

  constructor(private authService: AuthService,
    private router: Router){}
  isUserAdmin() {
    return this.authService.isAdmin();
  }
  logout() {
    this.authService.logout();
    this.router.navigateByUrl('/login-page');
  }
}
Our next step is to establish a connection between the add event page and the API. To achieve this, we need to create a new function within the HRDashboard service that will handle the HTTP POST request for creating a new event.
public postEvent(data: any, contentType: string = 'application/json-patch+json, application/json, text/json, application/*+json'): Observable<any>{
    const options = {
      headers: {
        'content-type': contentType,
        Authorization: `Bearer ${localStorage.getItem('hr_app_token')}`,
      },
    };
    const body = data;
    return this.http.post(`${API_ENDPOINT}/Event`, body, options);
  }
Furthermore, in the add-event.component.ts file, we need to define properties that will bind the input fields to the component and add the onSubmit function. Since the emails will be received in a single field separated by commas, we will need to split them before sending them to the API.
export class AddEventComponent {
  emails: string;
  category: string;
  title: string;
  date: string;
  errorMessage: string;

  constructor(private hrApiService: HRDashboardService,
    private router: Router) {}
  onSubmit(event) {
    event.preventDefault();
    const splitEmails = this.emails.split(', ');
    if (this.emails && this.category && this.title && this.date) {
      this.hrApiService.postEvent({ category: this.category, title: this.title, date: this.date, userEmails: splitEmails})
        .subscribe({
          next: (response) => {
              this.router.navigateByUrl('/');
          },
          error: (error) => {
            console.log(error)
            this.errorMessage = error.error["errors"] ? Object.values(error.error["errors"])[0] as string : error.error;
          }
        });
    }
    else {
      this.errorMessage = "All fields are required!";
    }
  }
}
Updating The Dashboard
Once the above steps are completed, we can move on to updating the dashboard. Prior to this, we must modify the HRDashboardService to replace all occurrences of ‘Bearer <auth-token>’ with Bearer ${localStorage.getItem(‘hr_app_token’)} in requests that have an authorization header. This ensures that we fetch data using the correct JWT token.
Furthermore, we need to add a new function to the HRDashboardService that fetches only the events related to the current user.
public getMyEvents(): Observable<any>{
    const options = {
      headers: {
        Authorization: `Bearer ${localStorage.getItem('hr_app_token')}`,
      },
    };
    return this.http.get(`${API_ENDPOINT}/Event`, options);
  }
Displaying User’s Events on Dashboard Page
Next, we will display the user’s events on the dashboard page using card components. To achieve this, we will need to open the dashboard.component.html file and use the *ngFor directive to render igx-card components based on the myEvents property, which will contain the events for the current user. Additionally, we can use *ngIf=”isUserAdmin()” to ensure that the grid is only visible to administrators. Furthermore, we should update the greeting on the dashboard to display the current user’s email, such as “Good Morning, {{email}}!”.
The resulting file should look like the following:
<div class="row-layout group">
    <div class="column-layout group_1">
        <div class="column-layout group_2">
            <div class="row-layout group_3">
                <div class="column-layout group_4">
                    <h5 class="h5">
                          Good Morning, {{email}}!
                    </h5>
                    <p class="text">
                           Your Highlights
                    </p>
                </div>
            </div>
            <div class="row-layout group_5">
                <igx-card *ngFor="let event of myEvents; index as i;"type="outlined" class="card">
                    <igx-card-media height="200px">
                                    <img src="/assets/Illustration1.svg" class="image" />
                    </igx-card-media>
                    <igx-card-header>
                        <h3 igxCardHeaderTitle>
                                 {{event.title}}
                        </h3>
                        <h5 igxCardHeaderSubtitle>
                                 {{event.category}}
                        </h5>
                        <h5 igxCardHeaderSubtitle>
                                 {{event.date}}
                        </h5>
                    </igx-card-header>
                </igx-card>
            </div>
        </div>
        <div class="row-layout group_6" *ngIf="isUserAdmin()">
            <div class="column-layout group_7">
                <h6 class="h6">
                      All Events
                </h6>
                        <igx-grid [data]="hRDashboardEventAll" primaryKey="id" displayDensity="cosy" [rowEditable]="true" [allowFiltering]="true" filterMode="excelStyleFilter" (rowEditDone)="eventRowEditDone($event)" (rowDeleted)="eventRowDeleted($event)" class="grid">
                          <igx-column field="id" dataType="string" header="id" [sortable]="true" [selectable]="false"></igx-column>
                          <igx-column field="title" dataType="string" header="title" [sortable]="true" [selectable]="false"></igx-column>
                          <igx-column field="category" dataType="string" header="category" [sortable]="true" [selectable]="false"></igx-column>
                          <igx-column field="date" dataType="date" header="date" [sortable]="true" [selectable]="false"></igx-column>
                <igx-action-strip>
                    <igx-grid-pinning-actions></igx-grid-pinning-actions>
                    <igx-grid-editing-actions [addRow]="true"></igx-grid-editing-actions>
                </igx-action-strip>
                        </igx-grid>
            </div>
        </div>
    </div>
</div>
In the dashboard.component.ts file, we will need to define two properties: myEvents and email. These properties should be populated with the relevant data in the ngOnInit function.
export class DashboardComponent implements OnInit {
  public hRDashboardEventAll: any = null;
  myEvents: any;
  email: any;
  constructor(
    private hRDashboardService: HRDashboardService,
    private authService: AuthService,
  ) {}
  ngOnInit() {
    this.hRDashboardService.getEventAll().subscribe(data => this.hRDashboardEventAll = data);
    this.hRDashboardService.getMyEvents().subscribe(data => this.myEvents = data);
    this.email = this.authService.getEmail();
  }
  public isUserAdmin() {
    return this.authService.isAdmin();
  }
…
We can now see on the dashboard all events for the current user and from the grid if the user is Administrator they can update and delete the entries from there.
Connecting The Add Role To User Page & The API
The final step is to establish a connection between the add role to user page and the API. To achieve this, we will need to create a function within the HRDashboard service that fetches user data from the API and populates the emails select component.
public getUsers(): Observable
<any>
{
    const options = {
      headers: {
        Authorization: `Bearer ${localStorage.getItem('hr_app_token')}`,
      },
    };
    return this.http.get(`${API_ENDPOINT}/User`, options);
  }

  public changeUserRole(data: any): Observable
<any>
{
    const options = {
      headers: {
        Authorization: `Bearer ${localStorage.getItem('hr_app_token')}`,
      },
    };
    const body = data;
    return this.http.post(`${API_ENDPOINT}/User/Role`, body, options);
  }
Once we are done with that we can go to add-role-to-user.component.ts and fetch them. We should also create onSubmit function which is going to call changeUserRole from HRDashboard service. The final result should look like this:
export class AddRoleToUserComponent {
  users: any;
  email: string;
  role: string;
  constructor(private hrApiService: HRDashboardService,
    private router: Router) { }
  ngOnInit() {
    this.hrApiService.getUsers()
      .subscribe(data => {
        this.users = data;
      });
  }

  onSubmit(event) {
    event.preventDefault();
    if (this.email && this.role) {
      this.hrApiService.changeUserRole({ email: this.email, role: this.role})
        .subscribe({
          next: (response) => {
              this.router.navigateByUrl('/');
          },
          error: (error) => {
            console.log(error)
          }
        });
    }
  }
}
<div class="row-layout group">
    <div class="column-layout group_1">
        <h2 class="h2">
                  Add Role to user
        </h2>
        <div class="row-layout group_2">
                  <igx-select type="border" class="select"[(ngModel)]="email">
            <igx-select-item *ngFor="let user of users; index as i;" value="{{user.email}}">
                          {{user.email}}
            </igx-select-item>
                    <label igxLabel>Email</label>
                  </igx-select>
                  <igx-select type="border" class="select"[(ngModel)]="role">
            <igx-select-item value="Administrator">
                          Administrator
            </igx-select-item>
                    <label igxLabel>Role</label>
                  </igx-select>
        </div>
            <button igxButton="raised" (click)="onSubmit($event)" igxRipple class="button">
              Submit
            </button>
    </div>
</div>
After following the necessary steps and completing the required tasks, we now have a fully functional application that has been built with App Builder and integrated with an API. This means that our application is now capable of communicating with the API, enabling users to perform various actions such as creating new events, adding roles to users, and viewing their personalized dashboard. You can view the whole code of the demo on GitHub.

